
Valentine cookies are a fun and sweet way to celebrate love on this special day. These treats come in all shapes and sizes, often decorated with pink and red icing or sprinkles. Perfect for sharing with your better half, friends, or even as a tasty gift, they add a personal touch to any Valentine’s Day celebration. Get ready to bake and spread some love with every bite!

Chocolate Sugar Cookies
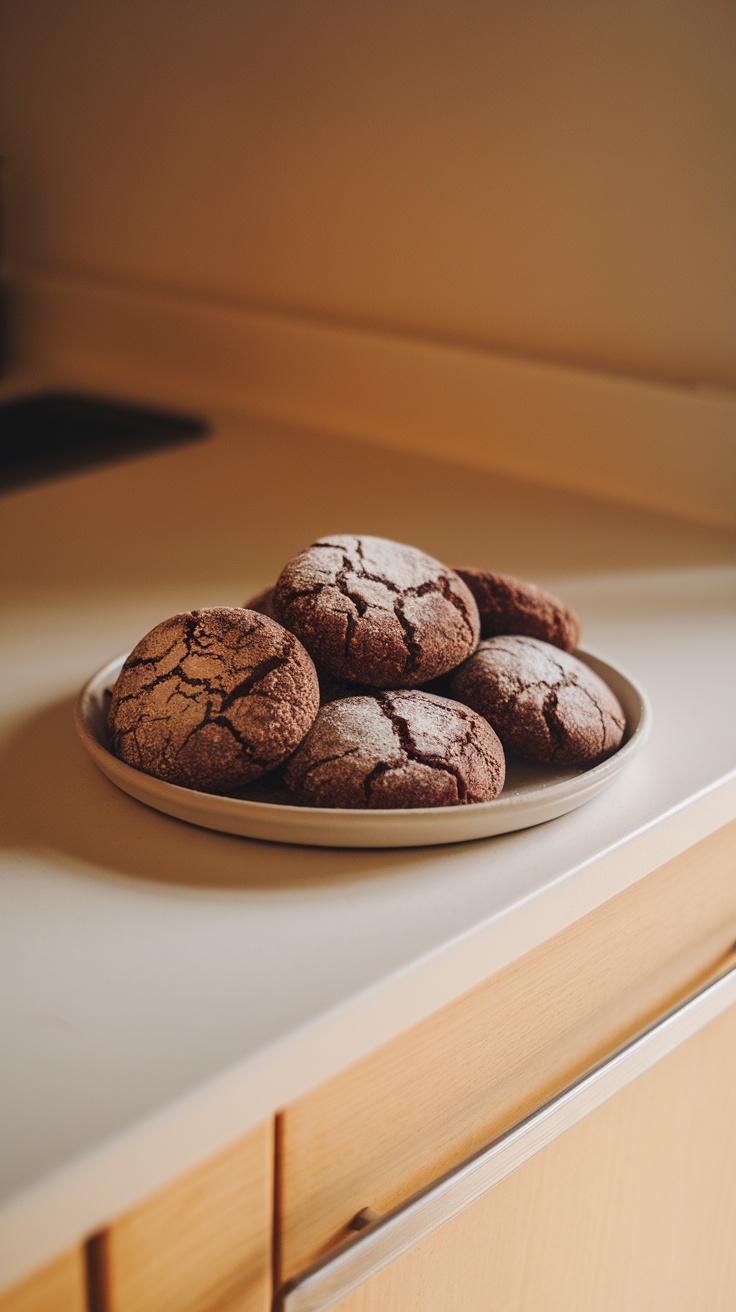
Chocolate sugar cookies are a delightful treat perfect for Valentine’s Day or any special occasion. These cookies are soft and chewy with a rich chocolate flavor. They have a lovely sweetness that pairs well with a hint of cocoa, making them irresistible.
Making these cookies is super easy, even for beginners! You can whip them up quickly and impress your loved ones with a batch of homemade goodness.
Ingredients
- 2 1/4 cups all-purpose flour
- 1/2 cup unsweetened cocoa powder
- 1 teaspoon baking soda
- 1/4 teaspoon salt
- 1 cup granulated sugar
- 1/2 cup unsalted butter, softened
- 1 large egg
- 1 teaspoon vanilla extract
- 1/4 cup powdered sugar for dusting
Instructions
- Preheat your oven to 350°F (175°C) and line a baking sheet with parchment paper.
- In a bowl, whisk together flour, cocoa powder, baking soda, and salt.
- In another bowl, cream together the butter and granulated sugar until light and fluffy. Add the egg and vanilla, mixing well.
- Gradually add the dry ingredients to the wet ingredients, mixing until a dough forms.
- Roll the dough into small balls and place them on the prepared baking sheet. Flatten them slightly.
- Bake for 8-10 minutes. Let them cool slightly, then dust with powdered sugar.
Red Velvet Crinkle Cookies
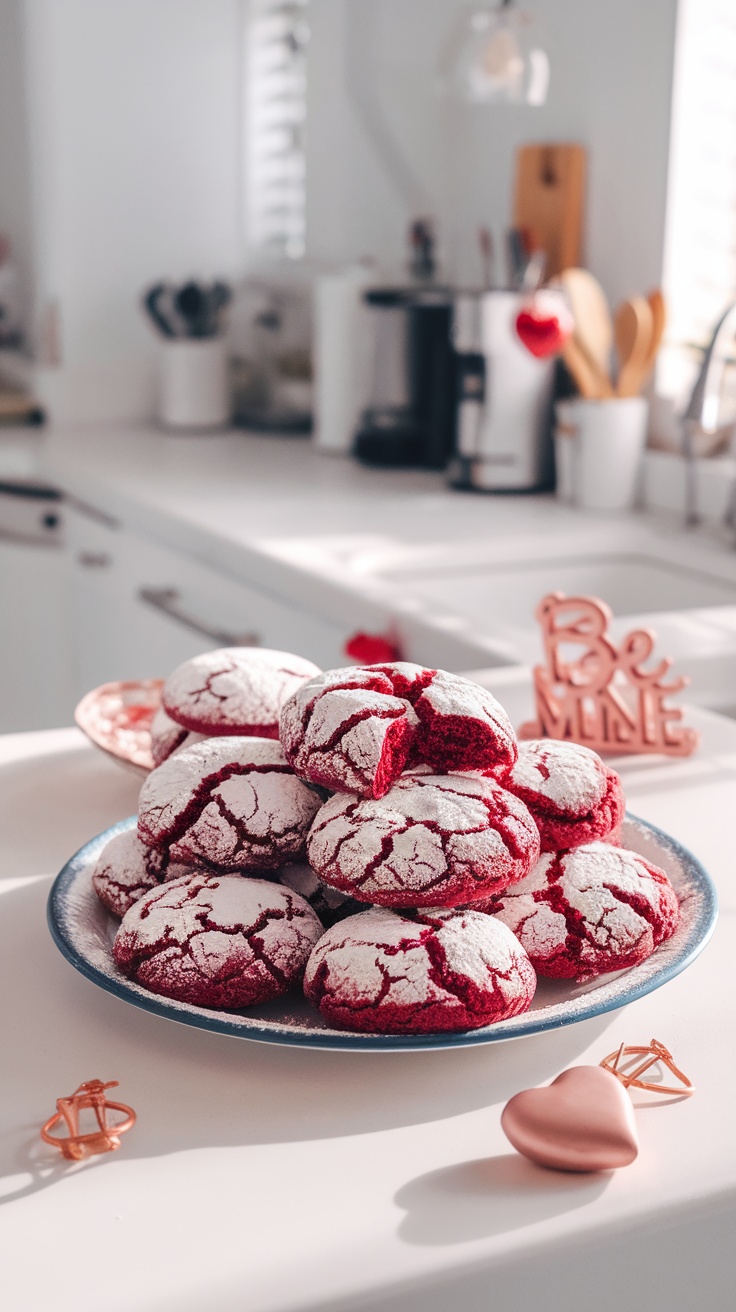
Red Velvet Crinkle Cookies are a fun and festive treat perfect for sharing on Valentine’s Day. These cookies are soft, chewy, and have a lovely red color with a sweet, slightly chocolatey flavor. They are coated in powdered sugar for a beautiful, snowy finish that gives them their crinkle effect.
Making these cookies is simple and quick! With just a few basic ingredients, you can whip up a batch in no time. They are sure to impress your loved ones and add a special touch to your Valentine’s celebrations.
Ingredients
- 1 cup all-purpose flour
- 1/4 cup cocoa powder
- 1/2 teaspoon baking powder
- 1/4 teaspoon salt
- 1/2 cup granulated sugar
- 1/4 cup brown sugar
- 1/2 cup vegetable oil
- 1 large egg
- 1 teaspoon vanilla extract
- 1 teaspoon red food coloring
- 1/2 cup powdered sugar (for coating)
Instructions
- Preheat your oven to 350°F (175°C) and line a baking sheet with parchment paper.
- In a bowl, combine flour, cocoa powder, baking powder, and salt. Mix well.
- In a separate bowl, whisk together granulated sugar, brown sugar, and vegetable oil until smooth. Add the egg, vanilla extract, and red food coloring, mixing until well combined.
- Gradually add the dry ingredients to the wet ingredients, stirring until a dough forms.
- Chill the dough in the refrigerator for about 30 minutes.
- Once chilled, scoop out tablespoon-sized balls of dough, roll them in powdered sugar, and place them on the prepared baking sheet.
- Bake for 10-12 minutes, or until the edges are set. Let them cool on the baking sheet for a few minutes before transferring them to a wire rack to cool completely.
Cheesecake Stuffed Red Velvet Cookies
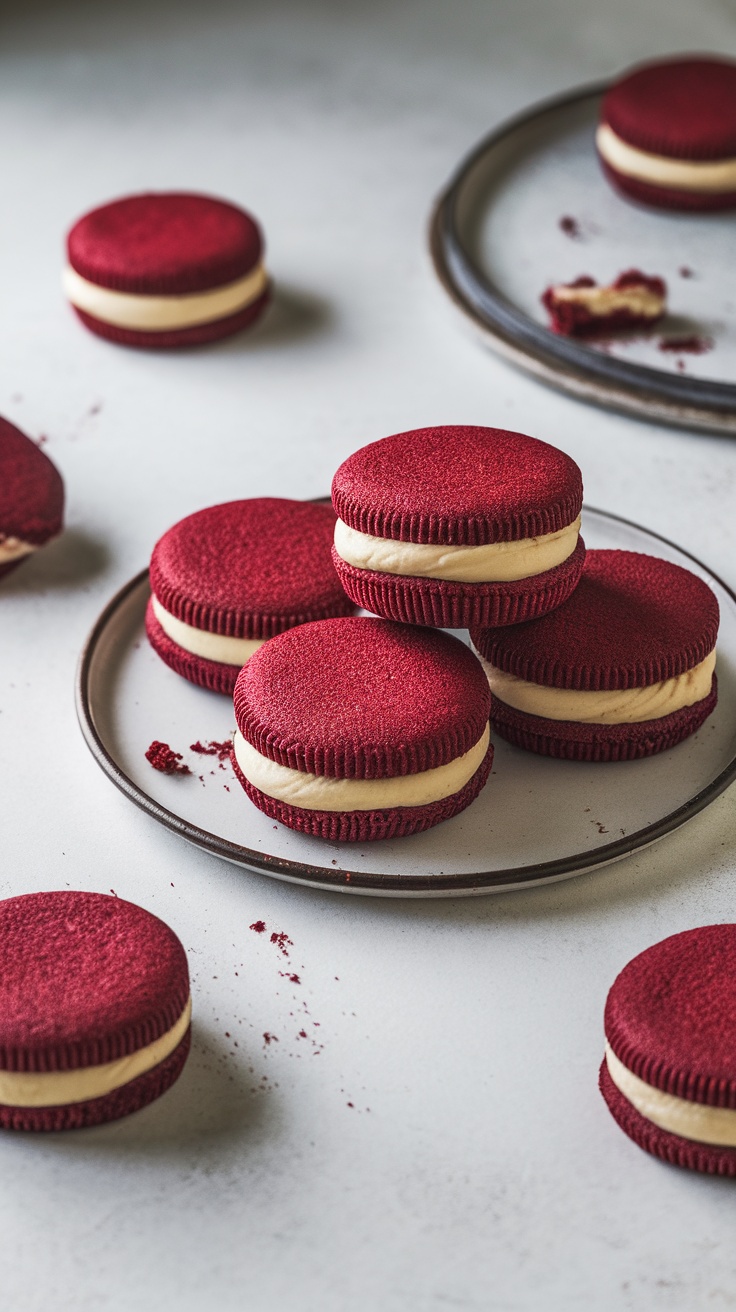
Cheesecake stuffed red velvet cookies are a delightful treat that perfectly blend the rich taste of red velvet with creamy cheesecake filling. These cookies are soft, chewy, and have a touch of sweetness that makes them ideal for sharing on special occasions, especially Valentine’s Day. Plus, they’re easier to make than you might think!
The combination of the chocolatey red velvet and the smooth, rich cheesecake creates a taste that will impress anyone. Your loved ones will appreciate the effort, and you’ll enjoy the process. So let’s get started!
Ingredients
- 1 cup unsalted butter, softened
- 1 cup granulated sugar
- 1 large egg
- 1 teaspoon vanilla extract
- 2 cups all-purpose flour
- 1/4 cup cocoa powder
- 1 teaspoon baking soda
- 1/2 teaspoon salt
- 2 tablespoons red food coloring
- 8 oz cream cheese, softened
- 1/2 cup powdered sugar
- 1 teaspoon vanilla extract (for filling)
Instructions
- Make the Cookie Dough: In a bowl, cream together the softened butter and sugar. Add the egg and vanilla, mixing well. In another bowl, combine flour, cocoa powder, baking soda, and salt. Gradually mix the dry ingredients into the wet ingredients until combined. Add the red food coloring and mix until the color is even.
- Prepare the Cream Cheese Filling: In a separate bowl, beat together softened cream cheese, powdered sugar, and vanilla extract until smooth.
- Assemble the Cookies: Preheat your oven to 350°F (175°C). Scoop out tablespoon-sized amounts of cookie dough and flatten them slightly. Place a small dollop of cheesecake filling in the center and cover with another piece of dough. Seal the edges.
- Bake: Place the filled cookies on a baking sheet lined with parchment paper. Bake for 10-12 minutes, or until the edges are set. Allow them to cool on the baking sheet for a few minutes before transferring to a wire rack.
- Enjoy: Once cooled, these cookies are ready to share and enjoy!
Chocolate-Dipped Strawberry Cookies
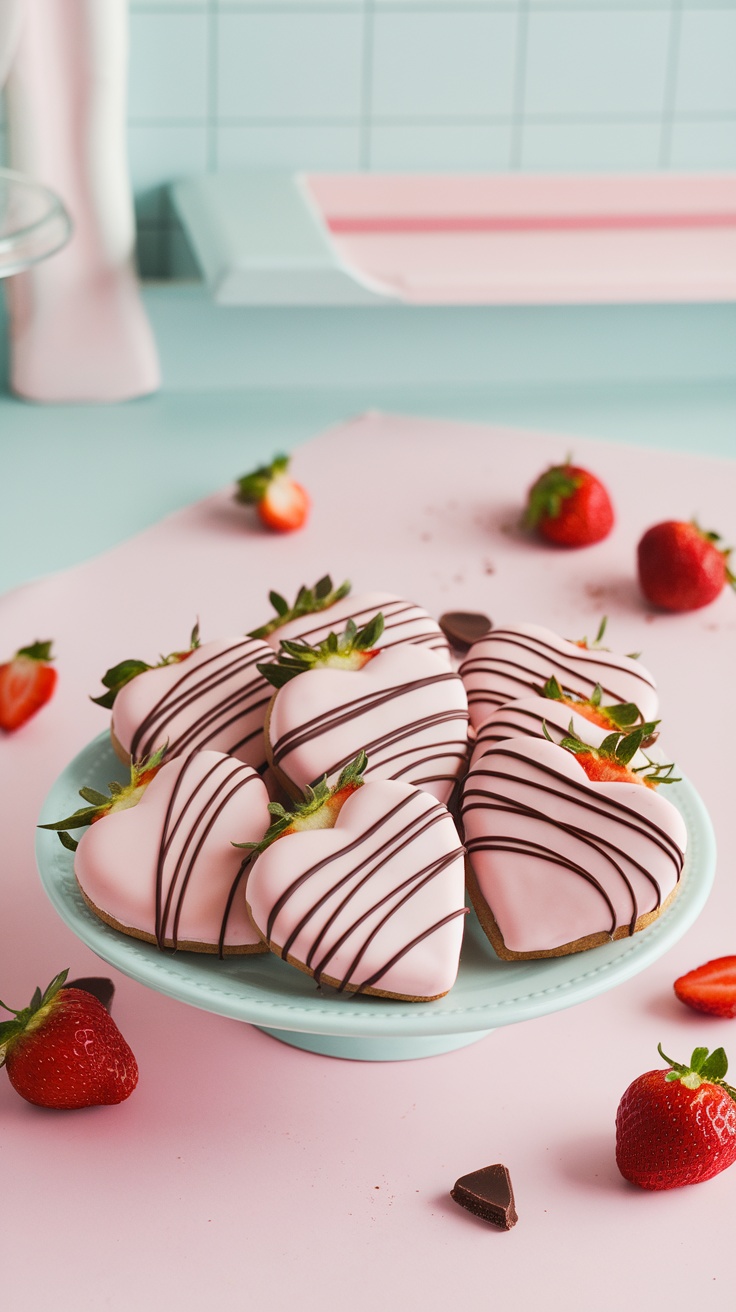
Chocolate-dipped strawberry cookies are a delightful treat that perfectly combines the sweetness of strawberries with the rich taste of chocolate. These cookies are not only tasty but also visually appealing, making them a great choice for Valentine’s Day or any special occasion. With easy-to-follow steps, even beginner bakers can whip up these delicious cookies without any hassle.
The soft cookie base paired with smooth chocolate creates a lovely balance that melts in your mouth. Topped with a hint of strawberry, they are sure to impress anyone who tries them. Plus, they are super simple to make, which means you can enjoy baking and sharing them without stress!
Ingredients
- 1 cup unsalted butter, softened
- 1 cup granulated sugar
- 1 large egg
- 1 teaspoon vanilla extract
- 2 1/2 cups all-purpose flour
- 1 teaspoon baking powder
- 1/2 teaspoon salt
- 1 cup white chocolate chips
- 1/2 cup dark chocolate chips
- Fresh strawberries for topping
Instructions
- Preheat your oven to 350°F (175°C). Line a baking sheet with parchment paper.
- In a large bowl, cream together the softened butter and granulated sugar until light and fluffy. Add the egg and vanilla extract, mixing well.
- In another bowl, whisk together the flour, baking powder, and salt. Gradually add the dry ingredients to the wet mixture, stirring until combined.
- Drop spoonfuls of dough onto the prepared baking sheet, spacing them about 2 inches apart. Bake for 10-12 minutes, or until the edges are lightly golden.
- While the cookies cool, melt the white chocolate chips in a microwave-safe bowl, stirring every 30 seconds until smooth. Dip half of each cookie into the melted chocolate and place them on a wire rack.
- Drizzle melted dark chocolate over the cookies and top with fresh strawberries.
- Allow the chocolate to set before serving. Enjoy your beautiful and tasty cookies!
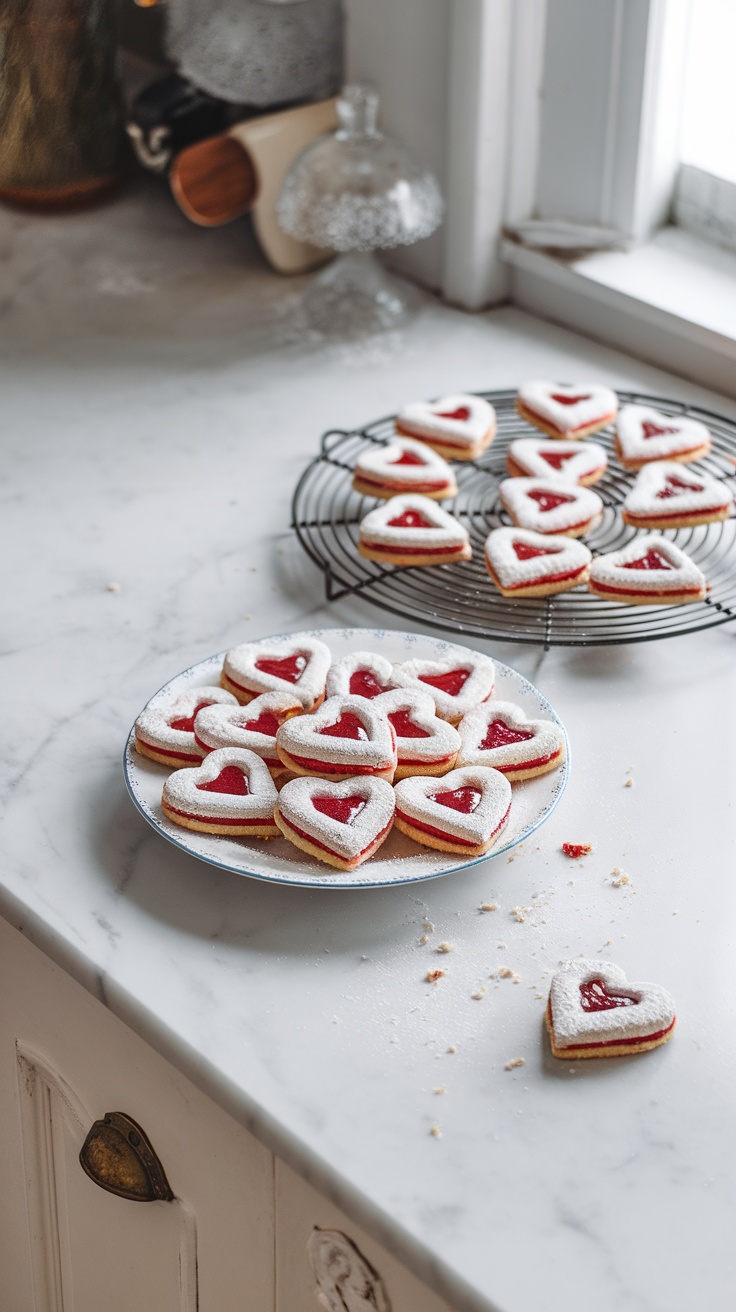
Linzer Cookies

Linzer cookies are a delightful twist on the classic Linzer torte, featuring two buttery cookie layers filled with jam and dusted with powdered sugar. These treats are not only delicious but also quite fun to make. The sweet and slightly tangy flavor of the jam pairs perfectly with the crumbly cookie, making them a wonderful snack for Valentine’s Day or any time you want to impress.
This recipe is super simple, making it perfect for bakers of all skill levels. You can customize the filling with your favorite jam or jelly, and the heart shape adds an extra touch of love. Get ready to share these sweet cookies with someone special!
Ingredients
- 1 1/2 cups all-purpose flour
- 1/2 cup unsalted butter, softened
- 1/3 cup powdered sugar
- 1/2 teaspoon vanilla extract
- 1/4 teaspoon almond extract (optional)
- 1/4 teaspoon salt
- 1/4 cup fruit jam (raspberry or strawberry works great)
- Extra powdered sugar for dusting
Instructions
- Make the Dough: In a bowl, mix flour and salt. In another bowl, cream together the softened butter and powdered sugar until light and fluffy. Stir in the vanilla and almond extracts. Gradually add the flour mixture until combined. Form the dough into a ball, wrap in plastic, and chill in the fridge for about 30 minutes.
- Roll and Cut: Preheat your oven to 350°F (175°C). On a floured surface, roll out the chilled dough to about 1/8 inch thick. Use a heart-shaped cookie cutter to cut out shapes. Cut out the centers of half of the cookies to create a window for the jam.
- Bake: Place the cookies on a baking sheet lined with parchment paper. Bake for 10-12 minutes or until the edges are lightly golden. Allow them to cool completely.
- Assemble: Spread a small amount of jam on the solid cookies. Top with the cookies that have cut-out centers. Dust the tops with powdered sugar before serving.
Heart-Shaped Sugar Cookies

Heart-shaped sugar cookies are a sweet treat that perfectly captures the spirit of love. They are soft and buttery, with a lovely sweetness that makes them hard to resist. Plus, decorating them can be a fun and creative activity, especially if you want to personalize them for someone special.
This recipe is simple enough for anyone to try, whether you’re an experienced baker or just starting out. The ingredients are easy to find, and the steps are straightforward. So grab your rolling pin and cookie cutters, and let’s get baking!
Ingredients
- 2 3/4 cups all-purpose flour
- 1 teaspoon baking soda
- 1/2 teaspoon baking powder
- 1 cup unsalted butter, softened
- 1 1/2 cups white sugar
- 1 egg
- 1 teaspoon vanilla extract
- 3/4 teaspoon salt
Instructions
- Prep the Oven: Preheat your oven to 375°F (190°C).
- Mix Dry Ingredients: In a bowl, stir together the flour, baking soda, baking powder, and salt. Set aside.
- Cream Butter and Sugar: In a large bowl, beat the softened butter and sugar together until smooth and creamy. This should take about 2-3 minutes.
- Add Egg and Vanilla: Add the egg and vanilla extract to the butter mixture and mix until well combined.
- Combine Mixtures: Gradually add the dry ingredients to the wet mixture, mixing until a soft dough forms.
- Shape the Cookies: Roll out the dough on a floured surface to about 1/4 inch thick. Use a heart-shaped cookie cutter to cut out cookies.
- Bake: Place the cookies on a baking sheet and bake for 8-10 minutes. They should be slightly golden around the edges.
- Cool: Remove the cookies from the oven and let them cool on a wire rack.
Strawberry Cheesecake Cookies
Strawberry cheesecake cookies are a delightful treat that combines the rich creaminess of cheesecake with the sweet tang of strawberries. They are soft, chewy, and bursting with flavor, making them the perfect dessert for any occasion, especially Valentine’s Day.
This recipe is simple and fun to make, perfect for baking with loved ones. Each bite offers a deliciously creamy center with a hint of strawberry, making these cookies hard to resist!
Ingredients
- 1 cup unsalted butter, softened
- 1 cup cream cheese, softened
- 1 cup granulated sugar
- 1 teaspoon vanilla extract
- 2 cups all-purpose flour
- 1/2 teaspoon baking powder
- 1/4 teaspoon salt
- 1 cup fresh strawberries, diced
- 1/2 cup powdered sugar (for dusting)
Instructions
- Preheat your oven to 350°F (175°C) and line a baking sheet with parchment paper.
- In a mixing bowl, cream together the softened butter, cream cheese, and granulated sugar until smooth.
- Add in the vanilla extract and mix well.
- In another bowl, whisk together the flour, baking powder, and salt. Gradually add this dry mixture to the wet mixture, mixing until just combined.
- Gently fold in the diced strawberries.
- Using a cookie scoop, drop dough onto the prepared baking sheet, spacing them about 2 inches apart.
- Bake for 12-15 minutes or until the edges are lightly golden. Let them cool on the sheet for a few minutes before transferring to a wire rack.
- Once cooled, dust with powdered sugar before serving.
Valentine’S Day Linzer Cookies
Valentine’s Day Linzer Cookies are a sweet way to celebrate love. These delightful treats have a buttery, crumbly texture, filled with fruity jam and dusted with powdered sugar. They are not only pleasing to the eye but also a joy to eat!
This recipe is easy to follow, making it perfect for bakers of all skill levels. You’ll find that the heart-shaped cookies are perfect for sharing or gifting to someone special.
Ingredients
- 2 cups all-purpose flour
- 1/2 cup powdered sugar
- 1 cup unsalted butter, softened
- 1 teaspoon vanilla extract
- 1/4 teaspoon salt
- 1/2 cup raspberry or strawberry jam
- Powdered sugar for dusting
Instructions
- Make the Dough: In a bowl, mix the softened butter and powdered sugar until creamy. Add vanilla extract and salt. Gradually add flour, mixing until a dough forms.
- Chill: Wrap the dough in plastic wrap and chill in the fridge for at least 30 minutes.
- Roll and Cut: Preheat the oven to 350°F (175°C). Roll out the chilled dough on a floured surface. Use a heart-shaped cutter to cut out shapes, and then use a smaller cutter to cut out the center of half of them.
- Bake: Place the cookies on a baking sheet lined with parchment paper. Bake for about 10-12 minutes until lightly golden. Let them cool completely.
- Assemble: Spread a teaspoon of jam on the whole cookies. Top with the cookies that have cutouts. Dust with powdered sugar before serving.
Heart-Shaped Chocolate Chip Cookies

These heart-shaped chocolate chip cookies are perfect for sharing love on Valentine’s Day. They are soft, chewy, and packed with chocolate goodness. The sweet buttery flavor combined with the rich chocolate chips makes them a delightful treat for anyone.
Baking these cookies is super simple, making it a fun activity for all ages. You can easily whip up a batch in no time, and they are sure to impress your loved ones!
Ingredients
- 2 1/4 cups all-purpose flour
- 1 teaspoon baking soda
- 1/2 teaspoon salt
- 3/4 cup unsalted butter, softened
- 3/4 cup brown sugar, packed
- 1/2 cup granulated sugar
- 1 teaspoon vanilla extract
- 2 large eggs
- 2 cups chocolate chips
Instructions
- Preheat your oven to 350°F (175°C) and line a baking sheet with parchment paper.
- In a bowl, mix together the flour, baking soda, and salt. Set aside.
- In a separate bowl, cream the softened butter, brown sugar, and granulated sugar until light and fluffy.
- Add the vanilla extract and eggs to the butter mixture, mixing until well combined.
- Gradually add the dry ingredients to the wet ingredients, stirring until everything is mixed together. Fold in the chocolate chips.
- Using a heart-shaped cookie cutter, cut out cookies from the dough and place them on the prepared baking sheet.
- Bake for 10-12 minutes or until the edges are golden. Let them cool on the baking sheet for a few minutes before transferring to a wire rack.
M&M Heart Cookies
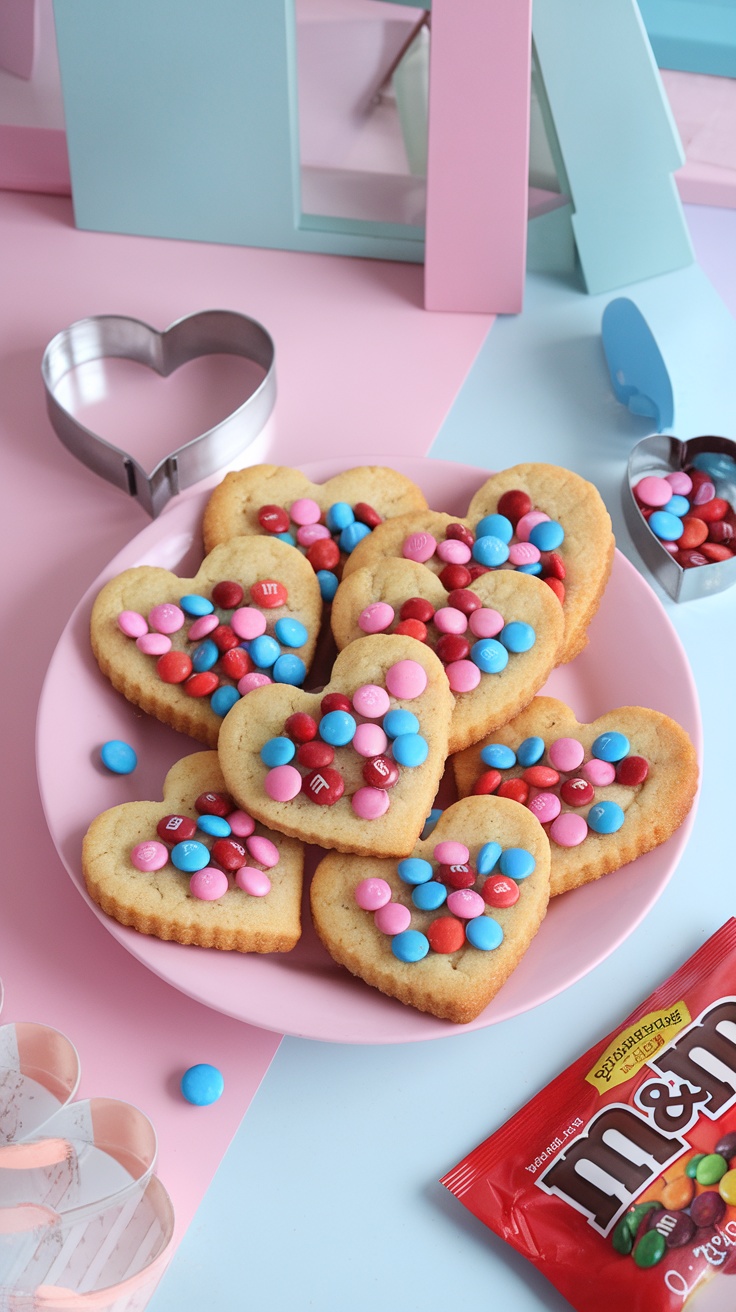
M&M Heart Cookies are a delightful treat perfect for sharing with loved ones. These cookies are soft, buttery, and topped with colorful M&Ms that add a fun crunch and sweetness. They’re simple to make, making them an ideal choice for baking with kids or surprising someone special.
The combination of rich cookies and vibrant candies makes these heart-shaped delights not only tasty but also visually appealing. Whether for Valentine’s Day or just as a sweet gesture, these cookies are sure to bring smiles all around!
Ingredients
- 1 cup unsalted butter, softened
- 1 cup granulated sugar
- 2 large eggs
- 1 teaspoon vanilla extract
- 2 ½ cups all-purpose flour
- 1 teaspoon baking soda
- ½ teaspoon salt
- 1 cup M&Ms, assorted colors
Instructions
- Preheat your oven to 350°F (175°C) and line a baking sheet with parchment paper.
- In a large bowl, beat together the softened butter and sugar until creamy. Add the eggs one at a time, stirring in the vanilla extract.
- In another bowl, mix the flour, baking soda, and salt. Gradually add this dry mixture to the wet ingredients until combined.
- Roll the dough into small balls and place them on the prepared baking sheet, flattening them slightly. Press the M&Ms into the center of each cookie.
- Bake for about 10-12 minutes, or until the edges are lightly golden. Allow them to cool on the baking sheet before transferring to a wire rack.
Fudgy Brownie Cookies
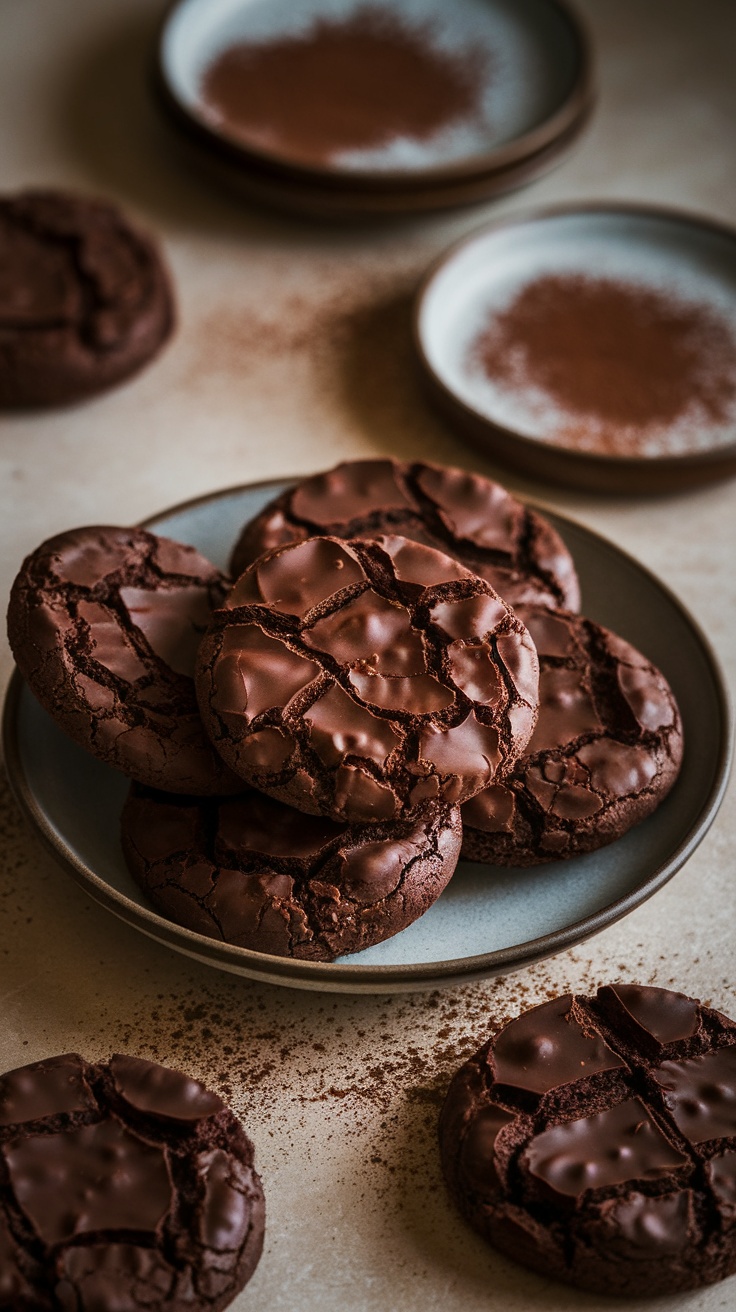
Fudgy brownie cookies are a delightful treat that combines the best of both worlds: the rich, chocolatey goodness of brownies with the chewy texture of cookies. These cookies are soft in the middle and have a slightly crisp edge, making them perfect for chocolate lovers. They are simple to make and require minimal ingredients, making them an ideal choice for a fun baking activity.
With just a few steps, you can whip up a batch that’s sure to impress. Whether you’re sharing them with your loved ones or enjoying them yourself, these fudgy brownie cookies are a sweet way to celebrate any occasion.
Ingredients
- 1 cup semisweet chocolate chips
- 1/2 cup unsalted butter
- 3/4 cup granulated sugar
- 2 large eggs
- 1 teaspoon vanilla extract
- 1/2 cup all-purpose flour
- 1/4 cup unsweetened cocoa powder
- 1/2 teaspoon baking powder
- 1/4 teaspoon salt
Instructions
- Melt the chocolate and butter: In a microwave-safe bowl, combine the chocolate chips and butter. Heat in the microwave in 30-second intervals, stirring in between until smooth.
- Mix in sugar and eggs: Stir the granulated sugar into the melted chocolate mixture. Then add the eggs and vanilla extract, mixing until well combined.
- Add dry ingredients: Slowly fold in the flour, cocoa powder, baking powder, and salt until just combined. Be careful not to overmix.
- Chill the dough: Cover the bowl with plastic wrap and refrigerate for about 30 minutes to firm up the dough.
- Preheat the oven: Preheat your oven to 350°F (175°C) and line a baking sheet with parchment paper.
- Scoop and bake: Use a cookie scoop or tablespoon to drop dough onto the prepared baking sheet, spacing them about 2 inches apart. Bake for 10-12 minutes or until the edges look set but the centers are still soft.
- Cool and enjoy: Let the cookies cool on the baking sheet for a few minutes before transferring them to a wire rack to cool completely. Enjoy your fudgy brownie cookies!
Royal Icing Sugar Cookies

Royal icing sugar cookies are a sweet treat that’s perfect for Valentine’s Day. These cookies are soft, buttery, and topped with a smooth layer of royal icing that can be decorated in any way you like. The taste is a delightful mix of sweet and slightly salty, making them hard to resist!
Making these cookies is simple and fun. You can involve the kids in decorating, or surprise your loved one with a batch. The royal icing dries hard, which makes these cookies easy to stack and package. Here’s how you can make them at home:
Ingredients
- 2 3/4 cups all-purpose flour
- 1 teaspoon baking powder
- 1/2 teaspoon salt
- 1 cup unsalted butter, softened
- 1 1/2 cups granulated sugar
- 1 large egg
- 1 teaspoon vanilla extract
- 4 cups powdered sugar
- 2 tablespoons meringue powder
- Water as needed
Instructions
- Make the Cookie Dough: In a bowl, mix flour, baking powder, and salt. In another bowl, cream butter and sugar until light and fluffy. Add the egg and vanilla, then mix well. Gradually add the flour mixture until combined.
- Shape and Chill: Roll the dough into a log, wrap in plastic, and chill for at least an hour. Once chilled, slice into rounds and place them on a baking sheet.
- Bake: Preheat your oven to 350°F (175°C). Bake the cookies for about 8-10 minutes or until the edges are lightly golden. Let them cool completely on a wire rack.
- Prepare the Royal Icing: In a bowl, mix powdered sugar, meringue powder, and water until smooth. Adjust the consistency by adding more water or powdered sugar as needed.
- Decorate: Once the cookies are cool, spread or pipe the royal icing on top. Get creative with colors and designs!
- Dry and Serve: Let the icing set completely before serving or storing the cookies.
Coconut Macaroons
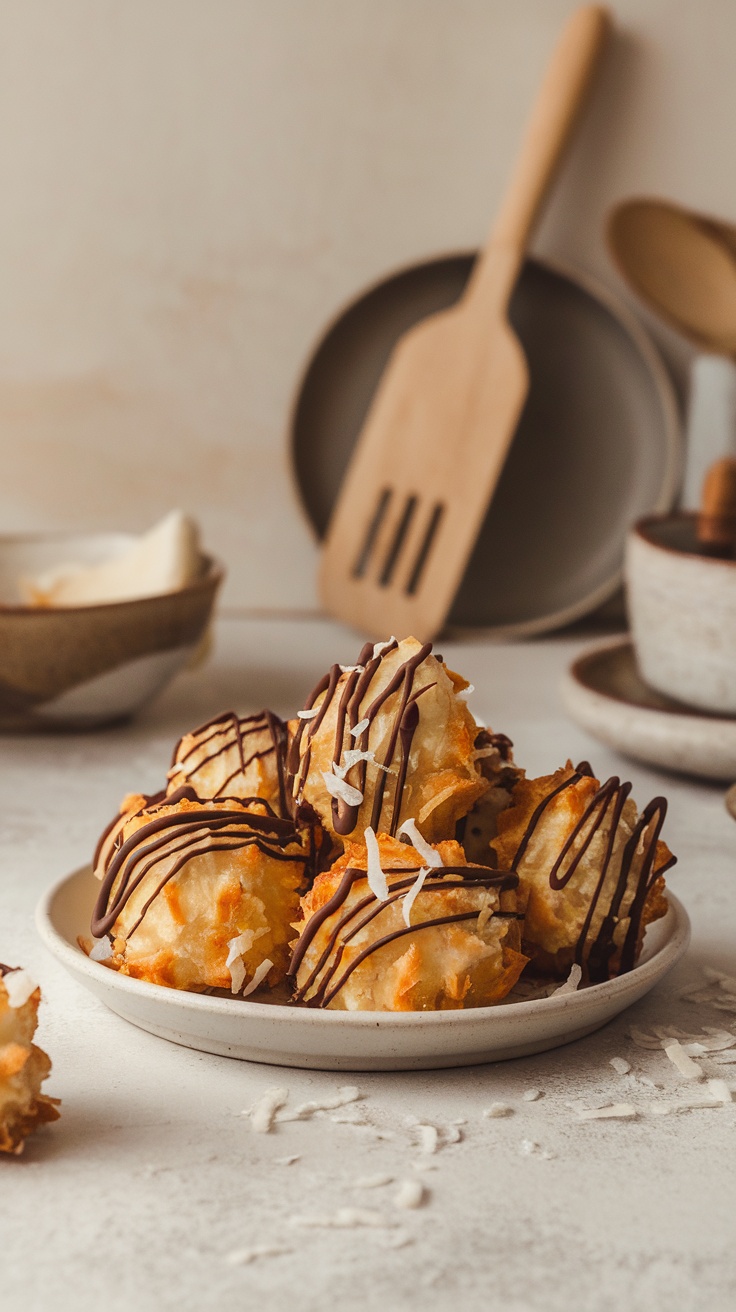
Coconut macaroons are sweet little treats that are perfect for special occasions, especially Valentine’s Day. They have a chewy texture with a lovely coconut flavor that many people enjoy. Drizzling some chocolate on top adds a delightful touch, making them even more tempting.
This recipe is super simple and quick to make. With just a few ingredients, you can whip up a batch of these delicious cookies in no time. They not only look beautiful but taste amazing too!
Ingredients
- 3 cups sweetened shredded coconut
- 1 cup sweetened condensed milk
- 1 teaspoon vanilla extract
- 2 large egg whites
- 1/4 teaspoon salt
- 1/2 cup semi-sweet chocolate chips (optional)
Instructions
- Mix the Ingredients: In a large bowl, combine shredded coconut, sweetened condensed milk, vanilla extract, egg whites, and salt. Stir until well mixed.
- Shape the Cookies: Preheat your oven to 325°F (160°C). Line a baking sheet with parchment paper. Using your hands, form small mounds of the mixture and place them on the baking sheet.
- Bake: Bake the macaroons for 20-25 minutes, or until they turn golden brown. Remove them from the oven and let them cool completely.
- Chocolate Drizzle: If you like, melt the chocolate chips in the microwave. Drizzle the melted chocolate over the cooled macaroons for a tasty finish.
- Serve: Enjoy your coconut macaroons with a cup of tea or coffee!
Sugar Cookie Bars
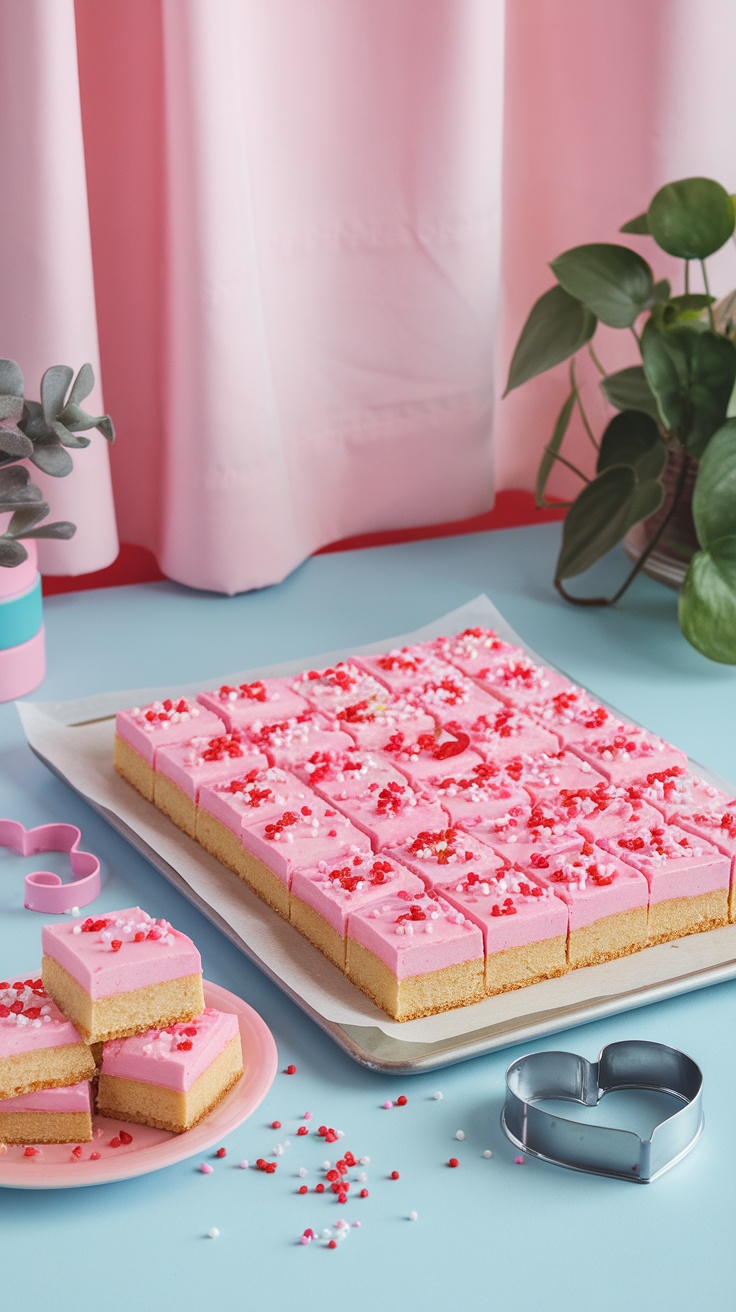
These sugar cookie bars are a sweet treat perfect for any Valentine’s celebration! They have a soft, buttery base that melts in your mouth, topped with a creamy pink frosting that adds a lovely sweetness. Simple to make and even easier to share, these bars are a delightful way to show you care.
Not only do they taste amazing, but they also look festive with a sprinkle of colorful decorations. They are quick to whip up and will impress your loved ones with their cheerful vibe. Enjoy baking these together as a fun activity!
Ingredients
- 1 cup unsalted butter, softened
- 1 cup granulated sugar
- 1 cup brown sugar, packed
- 2 large eggs
- 2 teaspoons vanilla extract
- 4 cups all-purpose flour
- 1 teaspoon baking powder
- 1/2 teaspoon salt
- 1 cup powdered sugar (for frosting)
- 1/4 cup milk (for frosting)
- 1/2 teaspoon vanilla extract (for frosting)
- Pink food coloring
- Sprinkles for decoration
Instructions
- Preheat your oven to 350°F (175°C) and grease a baking pan.
- In a large bowl, cream together the butter, granulated sugar, and brown sugar until smooth.
- Add the eggs and vanilla extract, mixing well until combined.
- In another bowl, whisk together the flour, baking powder, and salt. Gradually add this to the wet mixture, mixing until just combined.
- Press the dough evenly into the prepared baking pan and bake for 20-25 minutes or until lightly golden around the edges.
- Let it cool completely in the pan before frosting.
- For the frosting, mix powdered sugar, milk, vanilla, and pink food coloring until smooth. Spread over the cooled cookie bars.
- Top with sprinkles and cut into squares. Enjoy!
Marbled Heart Cookies
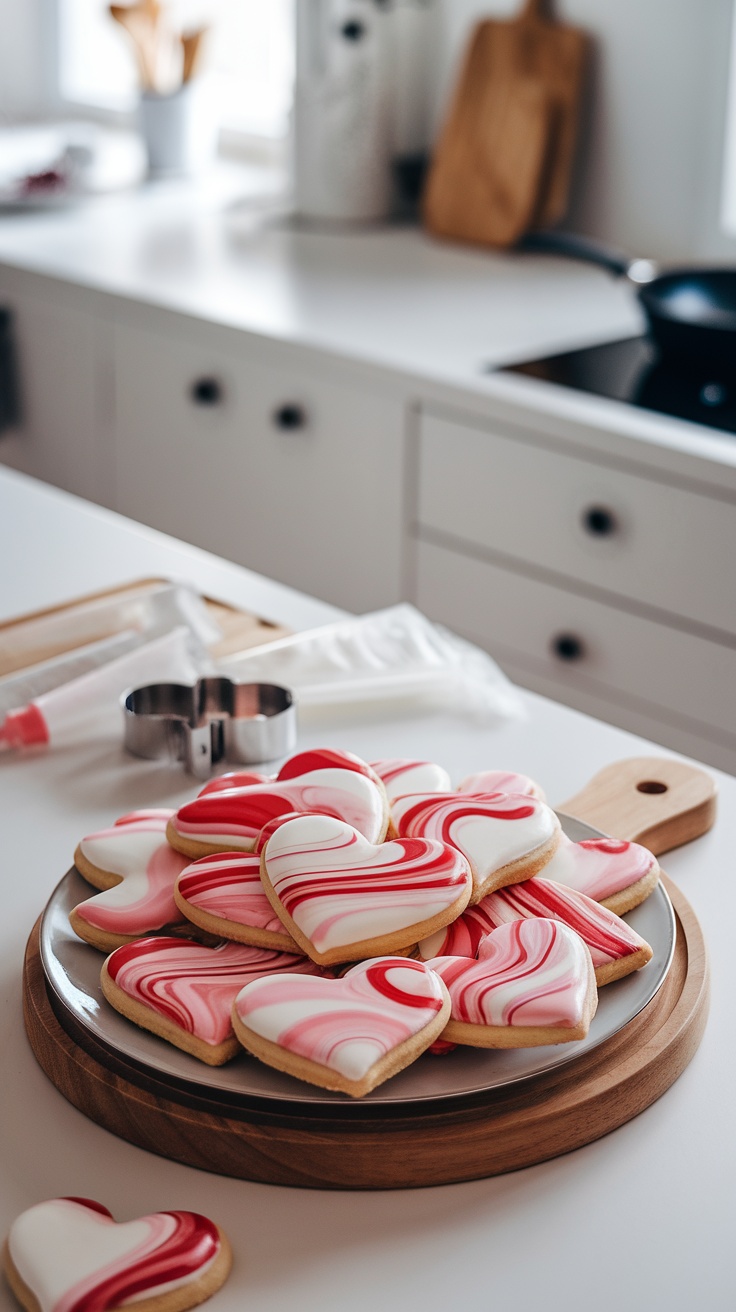
Marbled heart cookies are a sweet treat that combines fun colors with a delicious taste. They are perfect for Valentine’s Day or any occasion where you want to show some love. The cookies are buttery and soft, while the marbled icing adds a playful touch. Best of all, they are simple to make, so even beginner bakers can enjoy creating these cute cookies!
These cookies not only taste great but also look beautiful. The vibrant colors swirling together make them a standout on any dessert table. You can customize the colors to match your theme. Grab your cookie cutters and let’s get started!
Ingredients
- 2 3/4 cups all-purpose flour
- 1 teaspoon baking soda
- 1/2 teaspoon salt
- 1 cup unsalted butter, softened
- 1 cup granulated sugar
- 1 large egg
- 1 teaspoon vanilla extract
- 2 cups powdered sugar
- 3 tablespoons milk
- Food coloring (red, pink, white)
Instructions
- Make the Dough: In a bowl, mix flour, baking soda, and salt. In another bowl, cream the butter and sugar together until fluffy. Add the egg and vanilla, then mix in the flour mixture until combined.
- Shape the Cookies: Roll out the dough on a floured surface to about 1/4 inch thick. Cut out heart shapes with a cookie cutter and place them on a baking sheet.
- Bake the Cookies: Preheat your oven to 350°F (175°C) and bake the cookies for 8-10 minutes, until the edges are lightly golden. Let them cool completely on a wire rack.
- Make the Icing: In a bowl, combine powdered sugar and milk until smooth. Divide the icing into three bowls, adding food coloring to two of them to create red and pink.
- Decorate: Use a spoon to drizzle the colored icing over the cooled cookies, creating a marbled effect by swirling them together with a toothpick.
Peanut Butter Kiss Cookies
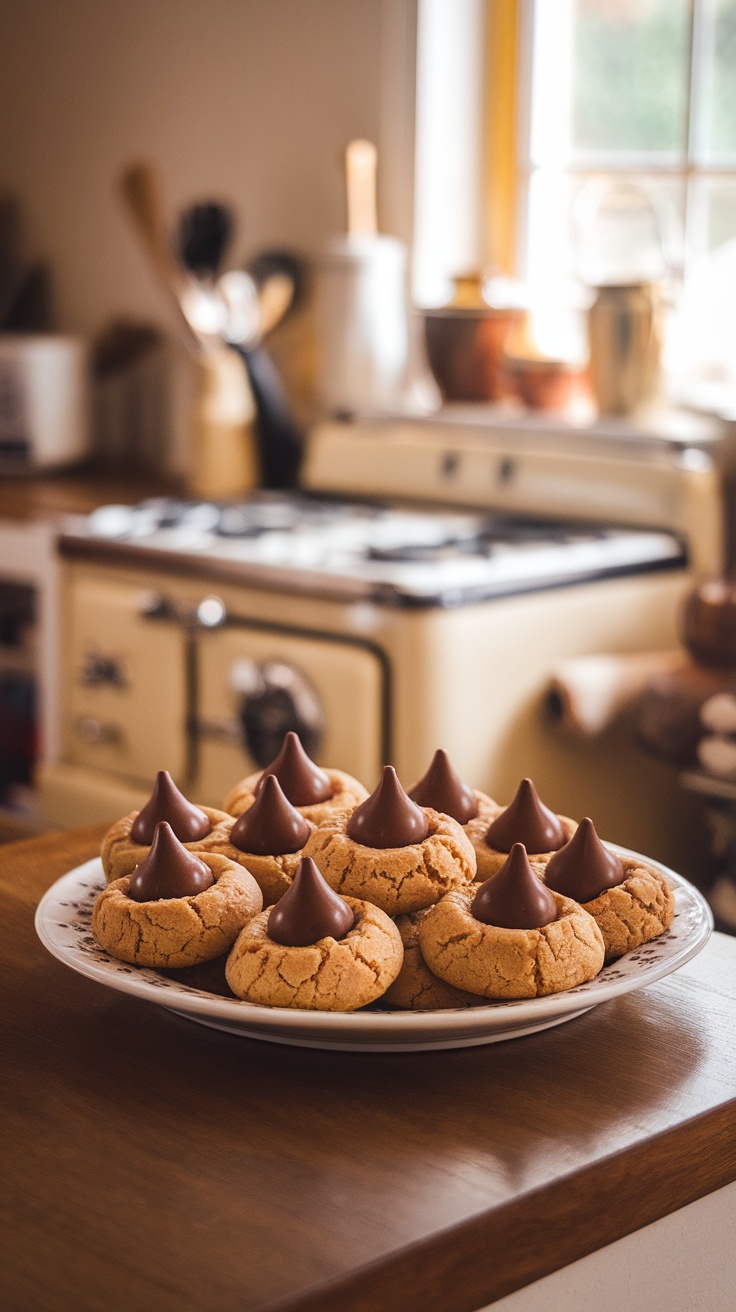
Peanut Butter Kiss Cookies are a delightful treat that combines the rich flavor of peanut butter with the sweet surprise of chocolate kisses on top. These cookies are soft, chewy, and incredibly easy to make. They have a sweet and nutty taste that’s perfect for sharing on Valentine’s Day or any special occasion.
Making these cookies is super simple and requires just a few ingredients. You’ll enjoy creating them, and they bake up in no time. Plus, the gooey chocolate on top makes them extra special!
Lemon Glazed Heart Cookies
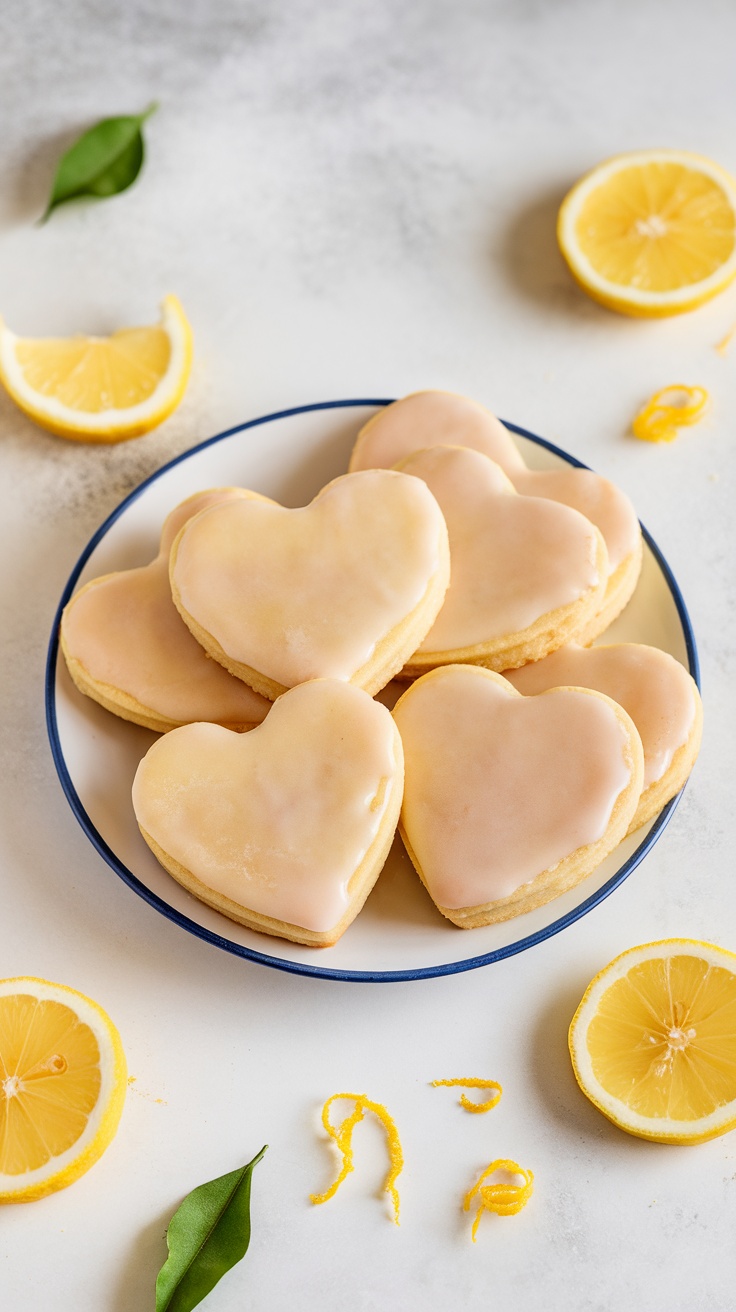
Lemon glazed heart cookies are a sweet treat that perfectly capture the essence of love and joy. These cookies are soft, buttery, and infused with a refreshing lemon flavor that brightens your taste buds. The tangy glaze adds a delightful shine and extra sweetness, making them a great snack for Valentine’s Day or any special occasion.
This recipe is simple and fun to make, perfect for baking with friends or family. Whether you’re celebrating love or just indulging in something sweet, these cookies are sure to bring smiles. Let’s get started on making these lovely lemon treats!
Ingredients
- 2 ¾ cups all-purpose flour
- 1 teaspoon baking powder
- ½ teaspoon salt
- 1 cup unsalted butter, softened
- 1 cup granulated sugar
- 1 large egg
- 1 teaspoon vanilla extract
- 2 tablespoons lemon juice
- 1 tablespoon lemon zest
- 1 ½ cups powdered sugar (for glaze)
- 2 tablespoons lemon juice (for glaze)
- 1 teaspoon lemon zest (for glaze)
Instructions
- Make the Dough: In a bowl, mix flour, baking powder, and salt together. In another bowl, beat softened butter and sugar until fluffy. Add the egg, vanilla, lemon juice, and lemon zest. Gradually mix in the flour mixture until combined.
- Chill the Dough: Wrap the dough in plastic wrap and refrigerate for at least 30 minutes. This helps the cookies hold their shape when baking.
- Shape and Bake: Preheat the oven to 350°F (175°C). Roll out the dough on a floured surface to about ¼ inch thick. Cut out heart shapes using a cookie cutter and place them on a baking sheet. Bake for 8-10 minutes until the edges are lightly golden.
- Prepare the Glaze: In a small bowl, mix powdered sugar, lemon juice, and lemon zest until smooth. Adjust with more sugar or juice if needed.
- Glaze the Cookies: Let the cookies cool completely. Dip the tops into the lemon glaze and let them set on a wire rack.
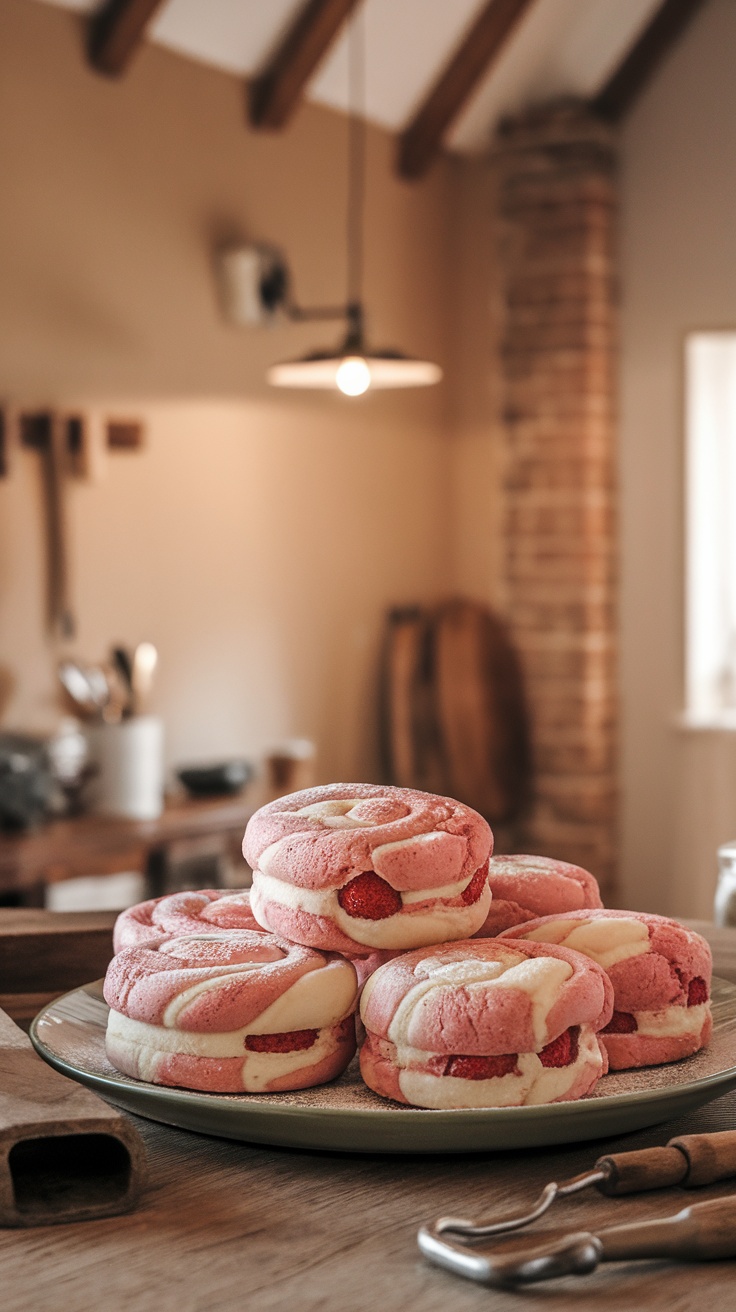
Strawberry Shortcake Cookies
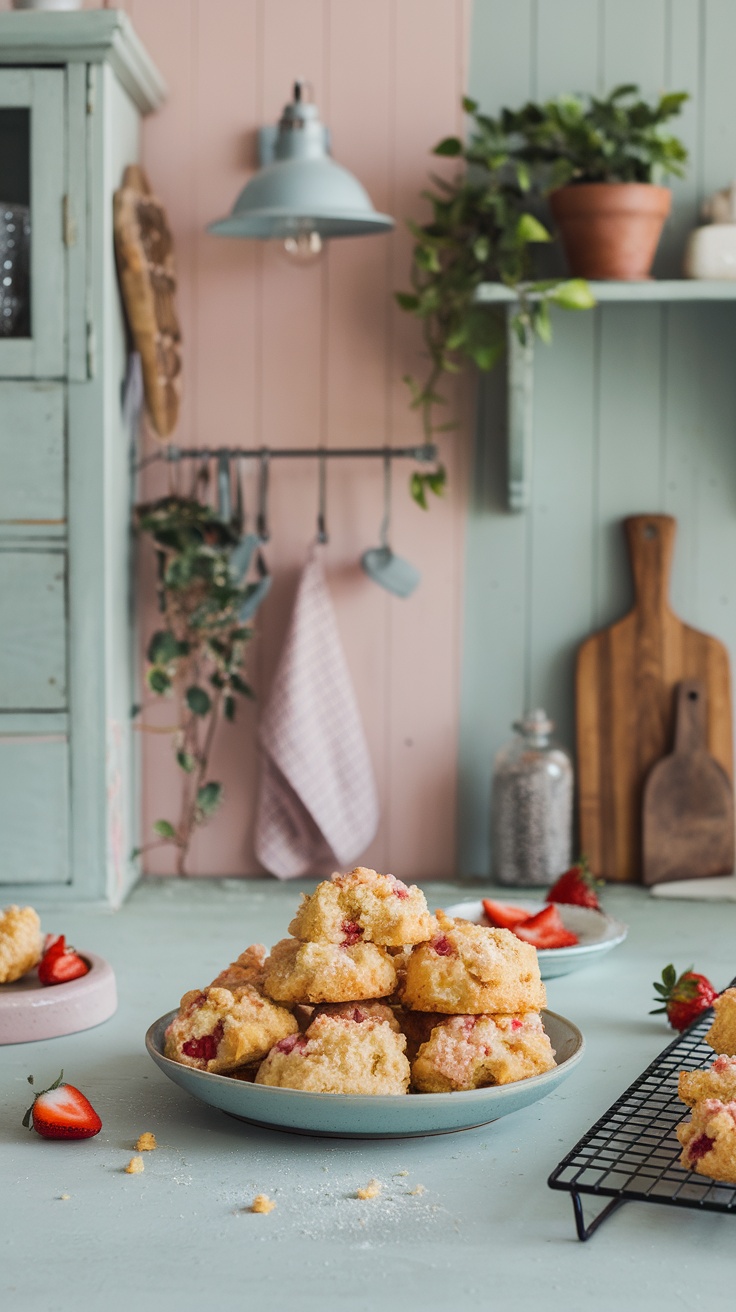
Strawberry shortcake cookies are a delightful treat that combines the sweetness of strawberries with a soft, buttery cookie. These cookies are easy to make, making them perfect for any occasion, especially Valentine’s Day. Each bite offers a burst of strawberry flavor, paired with a tender crumb that melts in your mouth.
With just a few simple ingredients, you can whip up these cookies in no time. They are great for sharing or enjoying on your own. Get ready to impress your loved ones with this sweet and simple recipe!
