
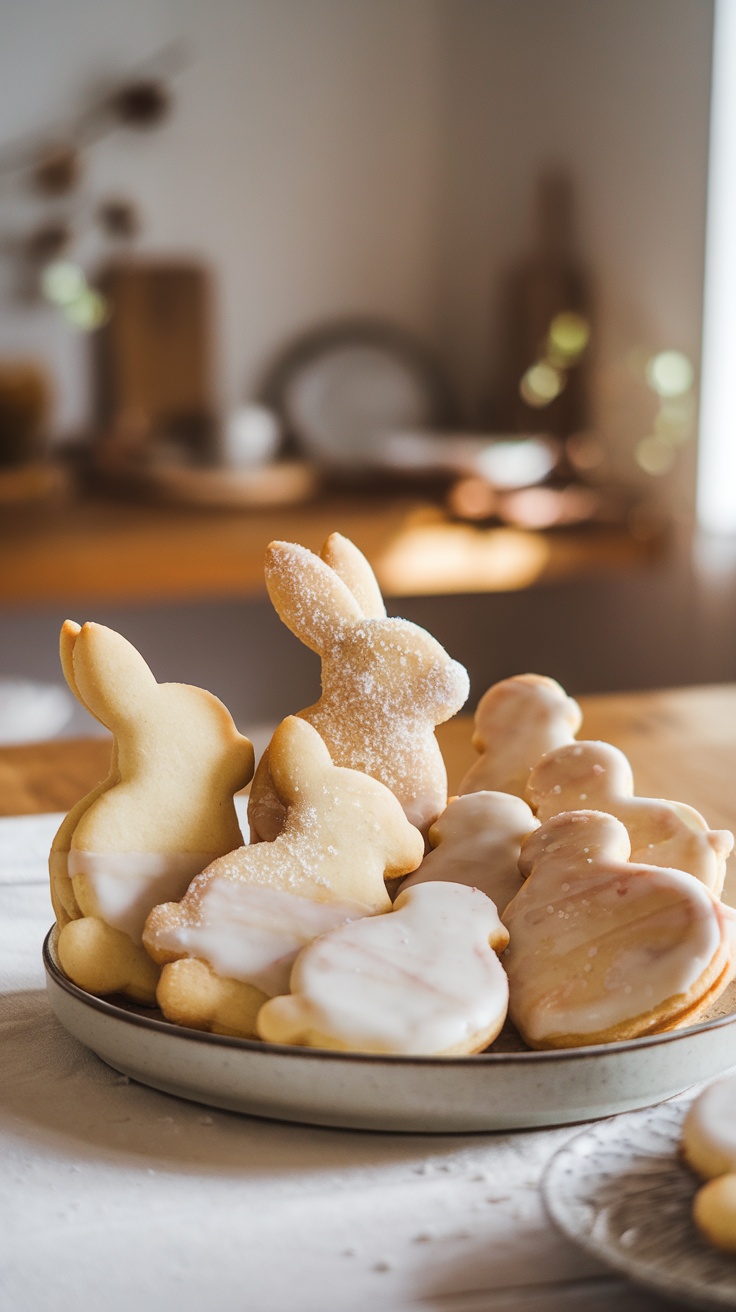
Easter sugar cookies are a delightful treat that brings a touch of sweetness to your holiday celebrations. With their buttery flavor and simple, colorful decorations, these cookies are fun to make and even more enjoyable to eat. Perfect for sharing with friends and family, they add a festive spirit to any gathering.

Easter Egg Sugar Cookies

Easter Egg Sugar Cookies are a delightful treat that perfectly captures the joy of the holiday. These cookies are soft, buttery, and topped with colorful icing, making them a fun and tasty addition to any Easter celebration. Not only do they taste sweet and satisfying, but they also provide a wonderful opportunity for creativity in decorating.
This recipe is simple to follow, making it great for bakers of all skill levels. Whether you’re baking with kids or just want to indulge in some festive fun, these cookies are sure to brighten up your holiday. They’re perfect for decorating and sharing with friends and family, making your Easter festivities even more special!
Ingredients
- 2 3/4 cups all-purpose flour
- 1 teaspoon baking soda
- 1/2 teaspoon baking powder
- 1 cup unsalted butter, softened
- 1 1/2 cups white sugar
- 1 egg
- 1 teaspoon vanilla extract
- 1/2 teaspoon almond extract
- 3 cups powdered sugar
- 1/4 cup milk
- Food coloring (various colors)
- Sprinkles for decoration
Instructions
- Preheat the oven to 375°F (190°C). In a small bowl, stir together flour, baking soda, and baking powder. Set aside.
- In a large bowl, cream together the butter and sugar until smooth. Beat in the egg, vanilla extract, and almond extract.
- Gradually blend the dry ingredients into the creamed mixture. Roll rounded teaspoonfuls of dough into balls, and place them onto ungreased cookie sheets. Flatten each ball slightly.
- Bake 8 to 10 minutes in the preheated oven, or until golden. Let cool on the baking sheet for a few minutes before transferring to wire racks to cool completely.
- To make the icing, mix powdered sugar and milk in a bowl until smooth. Divide the mixture into separate bowls and add food coloring as desired. Decorate the cooled cookies with icing and sprinkles.
Bunny Tail Cookies
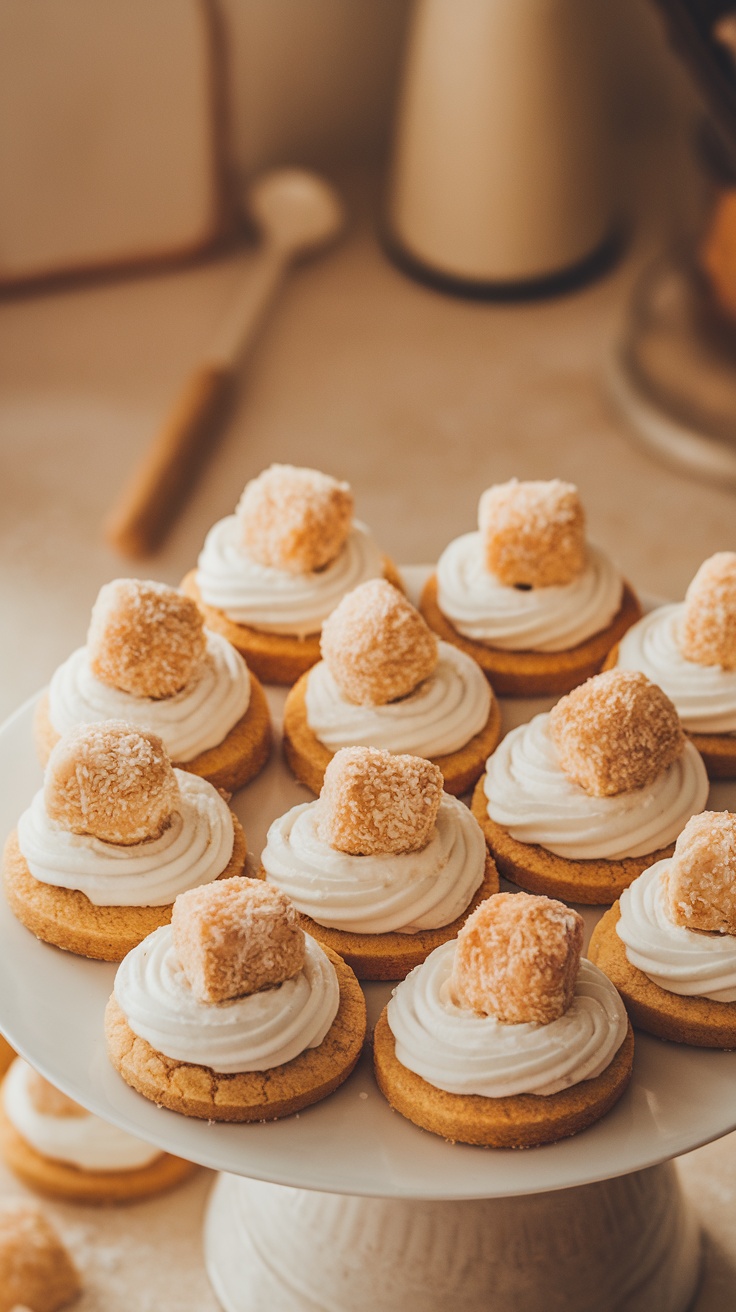
Bunny Tail Cookies are a delightful treat that brings a touch of Easter fun to your dessert table. These cookies are soft and chewy, topped with fluffy frosting and a cute little marshmallow tail, making them not only tasty but also adorable.
This recipe is simple enough for bakers of all levels to enjoy. The sweet, buttery flavor combined with the light frosting creates a lovely balance that kids and adults alike will love.
Ingredients
- 2 ¾ cups all-purpose flour
- 1 teaspoon baking soda
- ½ teaspoon salt
- 1 cup unsalted butter, softened
- 1 cup granulated sugar
- ½ cup brown sugar, packed
- 2 large eggs
- 1 teaspoon vanilla extract
- 1 cup frosting (store-bought or homemade)
- 1 cup mini marshmallows (for tails)
- Shredded coconut (optional, for decoration)
Instructions
- Preheat the Oven: Begin by preheating your oven to 350°F (175°C) and line a baking sheet with parchment paper.
- Mix the Dry Ingredients: In a bowl, whisk together the flour, baking soda, and salt. Set aside.
- Cream Butter and Sugars: In a large bowl, cream together the softened butter, granulated sugar, and brown sugar until light and fluffy. Add the eggs one at a time, mixing well after each addition, then stir in the vanilla.
- Combine: Gradually add the dry ingredients to the wet mixture, mixing until just combined.
- Shape the Cookies: Scoop tablespoon-sized amounts of dough and place them on the prepared baking sheet, spacing them a few inches apart.
- Bake: Bake for 10-12 minutes or until the edges are lightly golden. Remove from the oven and let cool on a wire rack.
- Decorate: Once the cookies are cool, pipe a swirl of frosting on top of each cookie. Place a mini marshmallow on each frosting swirl to create the bunny tail. For extra fun, roll the marshmallows in shredded coconut for a fluffy look if desired.
Carrot-Shaped Cookies
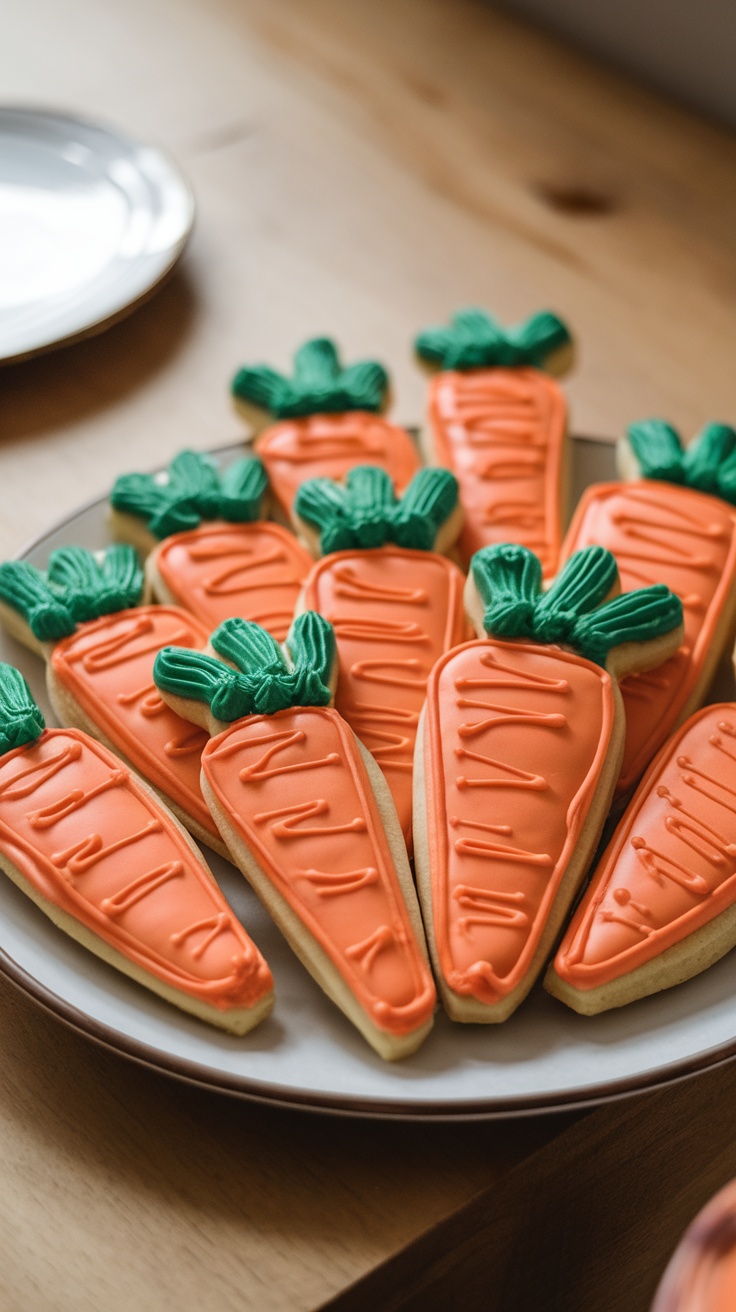
These carrot-shaped sugar cookies are a fun and festive treat for Easter celebrations. With their bright orange hue and sweet taste, they are sure to bring smiles to everyone’s faces. Not only do they taste delicious, but they are also quite simple to make, making them perfect for bakers of all skill levels.
The cookies have a soft, buttery texture that is perfectly complemented by the sweet icing. Decorating them is a fun activity for kids and adults alike. Enjoy these tasty little carrots as part of your Easter festivities or just because they look so cute!
Ingredients
- 2 3/4 cups all-purpose flour
- 1 teaspoon baking soda
- 1/2 teaspoon baking powder
- 1 cup unsalted butter, softened
- 1 1/2 cups granulated sugar
- 1 egg
- 1 teaspoon vanilla extract
- 1/2 teaspoon almond extract
- 1/4 teaspoon salt
- Orange and green icing for decoration
Instructions
- Preheat the oven to 375°F (190°C). In a bowl, mix flour, baking soda, baking powder, and salt.
- In another large bowl, cream together the softened butter and sugar until light and fluffy. Beat in the egg and both extracts.
- Gradually add the dry ingredients to the wet mixture, mixing until combined. Roll the dough into small balls and then shape them into carrot forms.
- Place the cookies on a baking sheet lined with parchment paper. Bake for 8-10 minutes or until the edges are lightly golden.
- Allow the cookies to cool completely before decorating them with orange icing for the carrot and green icing for the tops.
Floral Bunny And Egg Sugar Cookies

Easter is a celebration of spring, and what better way to embrace the season than with some delightful sugar cookies? These floral bunny and egg sugar cookies are not only tasty, but they also add a fun, decorative touch to your holiday festivities. They have a buttery flavor with a hint of sweetness, making them a treat that both kids and adults will enjoy.
This recipe is simple enough for bakers of all skill levels. With some basic ingredients and a little time, you can create these charming cookies that are sure to impress your family and friends.
Ingredients
- 2 3/4 cups all-purpose flour
- 1 teaspoon baking powder
- 1/2 teaspoon salt
- 1 cup unsalted butter, softened
- 1 1/2 cups granulated sugar
- 1 large egg
- 2 teaspoons vanilla extract
- 2 cups powdered sugar
- 2-3 tablespoons milk
- Food coloring (optional)
Instructions
- Make the Dough: In a bowl, mix flour, baking powder, and salt. In another bowl, cream together the softened butter and granulated sugar until fluffy. Beat in the egg and vanilla. Gradually add the flour mixture until a dough forms.
- Chill the Dough: Wrap the dough in plastic wrap and chill in the refrigerator for at least 1 hour.
- Roll and Cut: Preheat your oven to 350°F (175°C). Roll out the dough on a floured surface to about 1/4 inch thick. Use cookie cutters to cut out bunny and egg shapes. Place the cookies on a baking sheet lined with parchment paper.
- Bake: Bake the cookies for 8-10 minutes, or until the edges are lightly golden. Let them cool on a wire rack.
- Decorate: In a bowl, mix powdered sugar with milk until you reach a smooth, spreadable consistency. Add food coloring if desired. Decorate the cooled cookies with icing and let them set before serving.
Lemon Ricotta Cookies
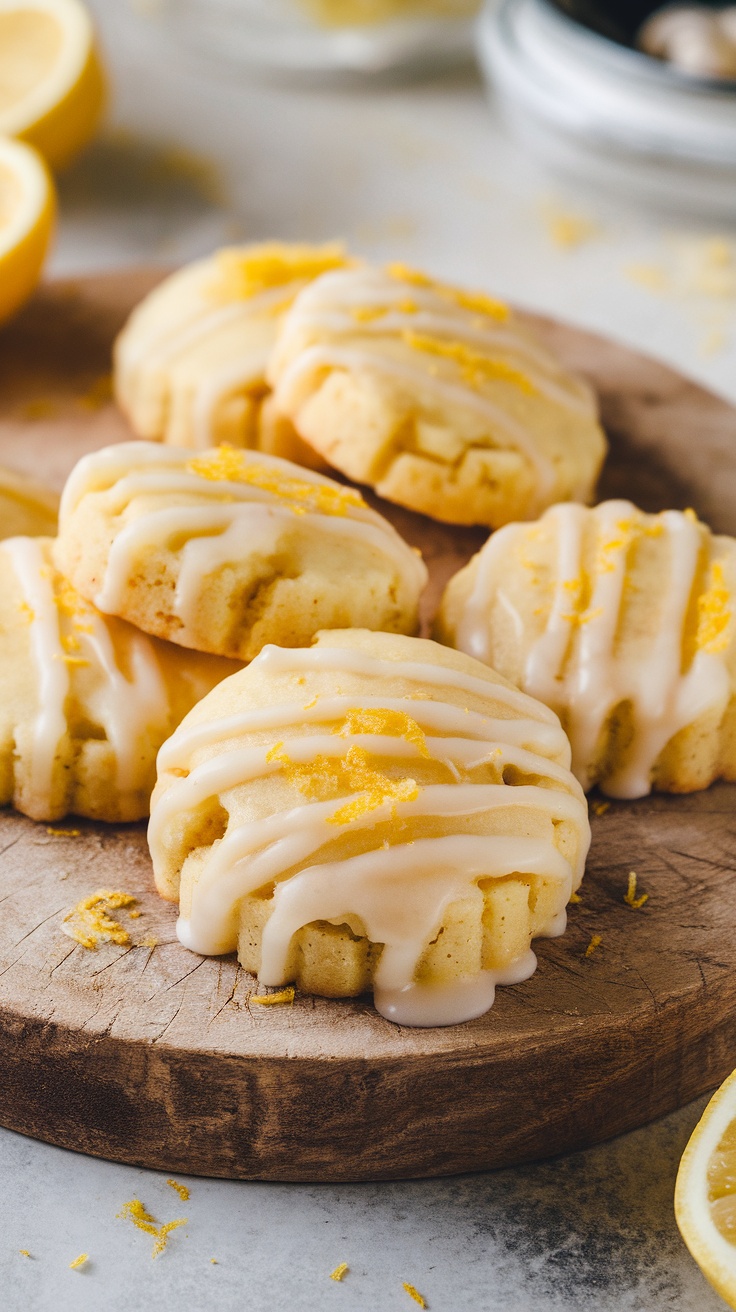
Lemon Ricotta Cookies are a delightful twist on the classic sugar cookie. With a soft, cake-like texture, these cookies are infused with fresh lemon zest and ricotta cheese, giving them a light and refreshing taste. They’re perfect for spring celebrations, especially around Easter!
This recipe is simple to follow, making it a fun treat to bake with family or friends. The subtle sweetness combined with the zesty lemon makes for a lovely dessert that will brighten any occasion. Plus, they are great for decorating, so feel free to get creative!
Ingredients
- 1 cup ricotta cheese
- 1/2 cup unsalted butter, softened
- 1 cup granulated sugar
- 1 large egg
- 2 teaspoons vanilla extract
- 1 1/2 cups all-purpose flour
- 1 teaspoon baking powder
- 1/2 teaspoon baking soda
- 1/4 teaspoon salt
- 2 tablespoons lemon zest
- 1 cup powdered sugar
- 2 tablespoons lemon juice
Instructions
- Prepare the Dough: In a large bowl, mix the ricotta cheese, softened butter, and granulated sugar until smooth. Add the egg and vanilla, mixing well. In another bowl, combine the flour, baking powder, baking soda, salt, and lemon zest. Gradually add the dry ingredients to the wet ingredients, stirring until just combined.
- Chill the Dough: Cover the bowl with plastic wrap and refrigerate the dough for at least 30 minutes. This helps the cookies hold their shape while baking.
- Shape and Bake: Preheat your oven to 350°F (175°C). Scoop tablespoon-sized balls of dough onto a lined baking sheet, spacing them a few inches apart. Bake for 12-15 minutes, or until the edges are lightly golden.
- Make the Glaze: In a small bowl, whisk together the powdered sugar and lemon juice until smooth. Drizzle the glaze over the cooled cookies for a sweet finish.
Easter Blossom Sugar Cookies
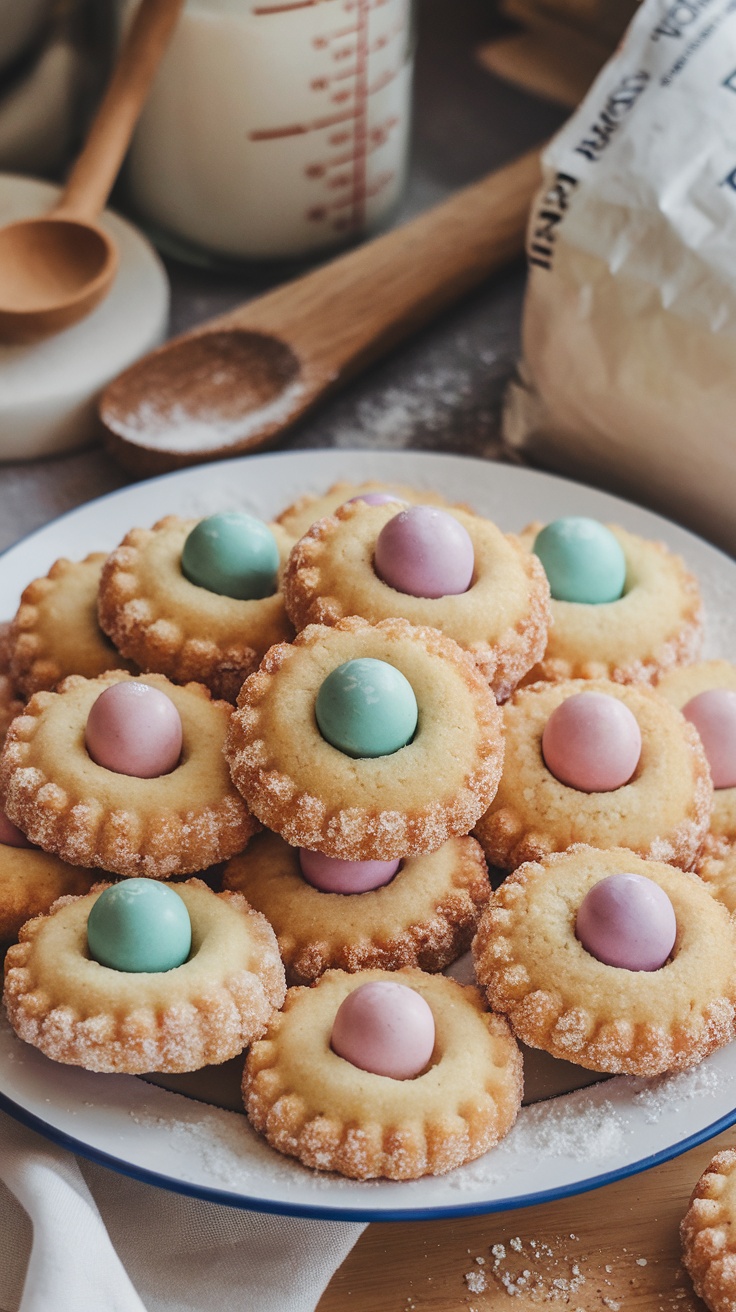
Easter Blossom Sugar Cookies are a delightful treat that brings a touch of springtime cheer to your celebrations. These cookies are soft, buttery, and have a light sweetness, making them perfect for sharing with family and friends. Topped with colorful candy eggs, they are not only tasty but also visually appealing, adding a festive flair to your dessert table.
This recipe is simple enough for bakers of all levels. With just a few ingredients and straightforward steps, you can whip up a batch that everyone will love. The combination of the buttery cookie and the crunchy candy center creates a delightful texture that will have you reaching for seconds!
Ingredients
- 2 3/4 cups all-purpose flour
- 1 teaspoon baking powder
- 1/2 teaspoon salt
- 1 cup unsalted butter, softened
- 1 1/2 cups granulated sugar
- 2 large eggs
- 1 teaspoon vanilla extract
- 1/2 teaspoon almond extract
- 1/4 cup granulated sugar, for rolling
- 1 cup chocolate or pastel candy eggs
Instructions
- Preheat the Oven: Preheat your oven to 350°F (175°C). Line a baking sheet with parchment paper.
- Mix Dry Ingredients: In a bowl, whisk together the flour, baking powder, and salt. Set aside.
- Cream Butter and Sugar: In a large bowl, beat the softened butter and granulated sugar until light and fluffy. Add the eggs and mix well. Stir in the vanilla and almond extracts.
- Combine Mixtures: Gradually add the dry ingredients to the butter mixture, mixing until just combined.
- Shape Cookies: Roll the dough into small balls, then roll in the extra granulated sugar. Place on the prepared baking sheet, spacing them about 2 inches apart.
- Bake: Bake for 10-12 minutes or until the edges are lightly golden. Remove from the oven, and immediately press a candy egg into the center of each cookie.
- Cool: Allow the cookies to cool on the baking sheet for a few minutes before transferring them to a wire rack to cool completely.
Jelly Bean Sugar Cookies
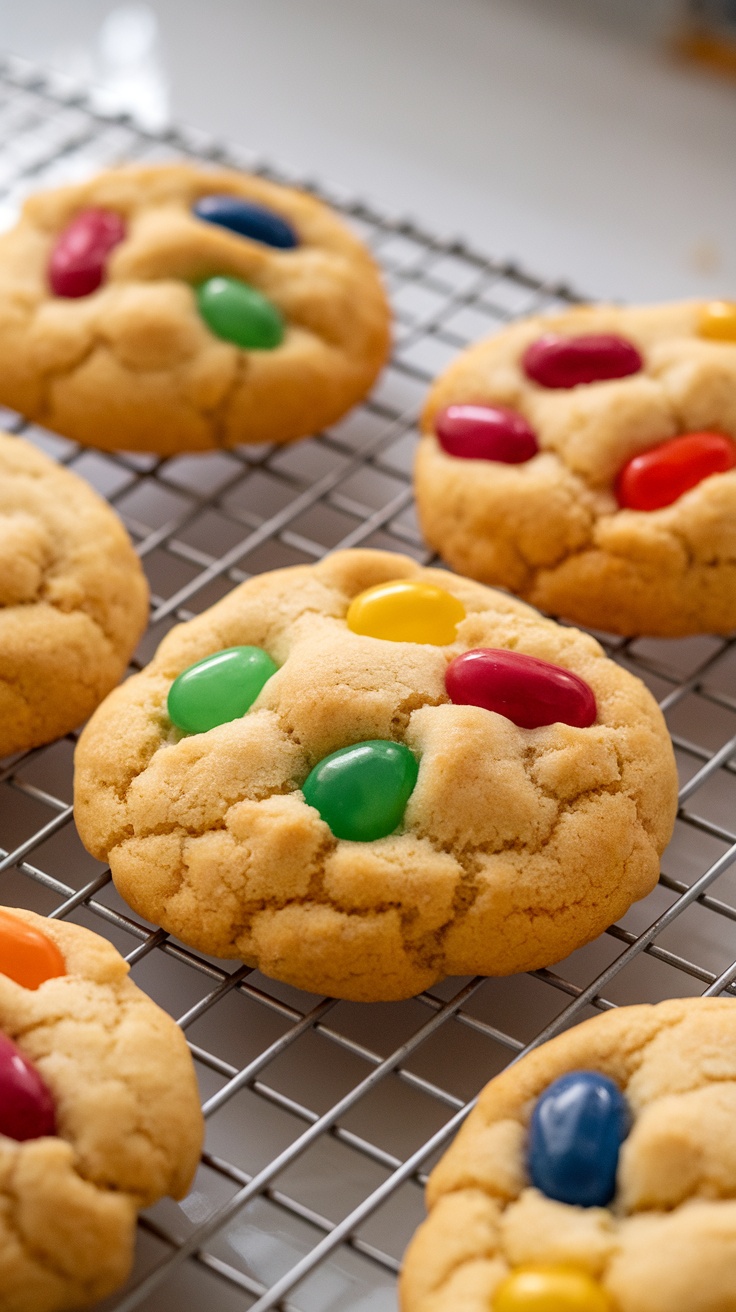
Jelly Bean Sugar Cookies are a delightful treat that perfectly captures the spirit of Easter. These cookies are soft and chewy, offering a sweet and buttery flavor that pairs wonderfully with the colorful jelly beans on top. Making these cookies is simple and fun, making it a great activity to do with family or friends.
With just a few ingredients, you can whip up a batch in no time. The combination of the classic sugar cookie base and the chewy jelly beans creates a festive look and a burst of flavor in every bite. Whether you’re serving them at a holiday gathering or just enjoying them at home, these cookies are sure to bring smiles all around.
Ingredients
- 2 3/4 cups all-purpose flour
- 1 teaspoon baking soda
- 1/2 teaspoon salt
- 1 cup unsalted butter, softened
- 1 1/2 cups granulated sugar
- 1/2 cup brown sugar, packed
- 2 large eggs
- 2 teaspoons vanilla extract
- 1 cup jelly beans
Instructions
- Preheat the Oven: Preheat your oven to 350°F (175°C) and line a baking sheet with parchment paper.
- Mix Dry Ingredients: In a bowl, whisk together flour, baking soda, and salt. Set aside.
- Cream Butter and Sugars: In a large bowl, beat the softened butter, granulated sugar, and brown sugar until light and fluffy. This should take about 2-3 minutes.
- Add Eggs and Vanilla: Mix in the eggs one at a time, followed by the vanilla extract, until well combined.
- Combine Mixtures: Gradually add the dry ingredients to the wet mixture, mixing until just combined.
- Add Jelly Beans: Fold in the jelly beans gently.
- Scoop Cookies: Using a cookie scoop or tablespoon, drop dough onto the prepared baking sheet, spacing them about 2 inches apart.
- Bake: Bake for 10-12 minutes or until the edges are lightly golden. The centers may look slightly underbaked, but they’ll set as they cool.
- Cool Down: Allow the cookies to cool on the baking sheet for a few minutes before transferring them to a wire rack to cool completely.
Pizzelle
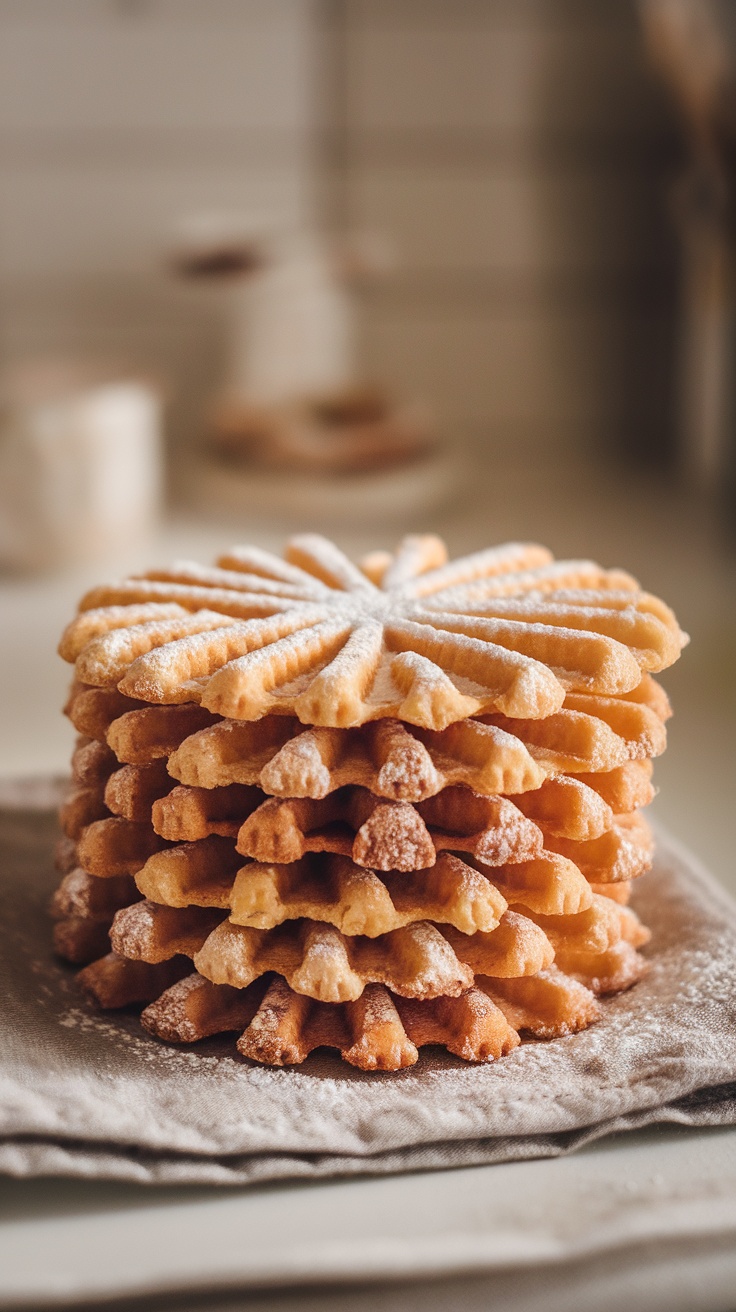
Pizzelle are delightful Italian cookies that bring a touch of tradition to any holiday gathering, especially Easter. With their thin, crisp texture and beautiful designs, these cookies are not just tasty; they’re also fun to make. Their light sweetness, often enhanced with hints of vanilla or anise, makes them a perfect treat for both kids and adults.
Making pizzelle is simple and can be a great activity to share with family. The batter mixes quickly, and with a pizzelle iron, they cook up in mere minutes. Once cooled, sprinkle them with powdered sugar or fill them with your favorite creams for an extra special touch!
Ingredients
- 2 cups all-purpose flour
- 3 large eggs
- 3/4 cup granulated sugar
- 1/2 cup unsalted butter, melted
- 1 teaspoon vanilla extract
- 1 teaspoon anise extract (or to taste)
- 1 teaspoon baking powder
- Powdered sugar for dusting
Instructions
- Make the Batter: In a large bowl, whisk together the eggs and granulated sugar until well combined. Add the melted butter, vanilla extract, and anise extract, mixing until smooth. Gradually add the flour and baking powder, stirring until you have a thick batter.
- Preheat the Iron: Preheat your pizzelle iron according to the manufacturer’s instructions.
- Cook the Pizzelle: Once the iron is hot, spoon a small amount of batter onto the center of each mold. Close the iron and cook for about 30 seconds to 1 minute, or until golden brown. Carefully remove the pizzelle and let them cool on a wire rack.
- Serve: Once cooled, dust the pizzelle with powdered sugar before serving. Enjoy them plain or use them to create ice cream sandwiches!
Springerle
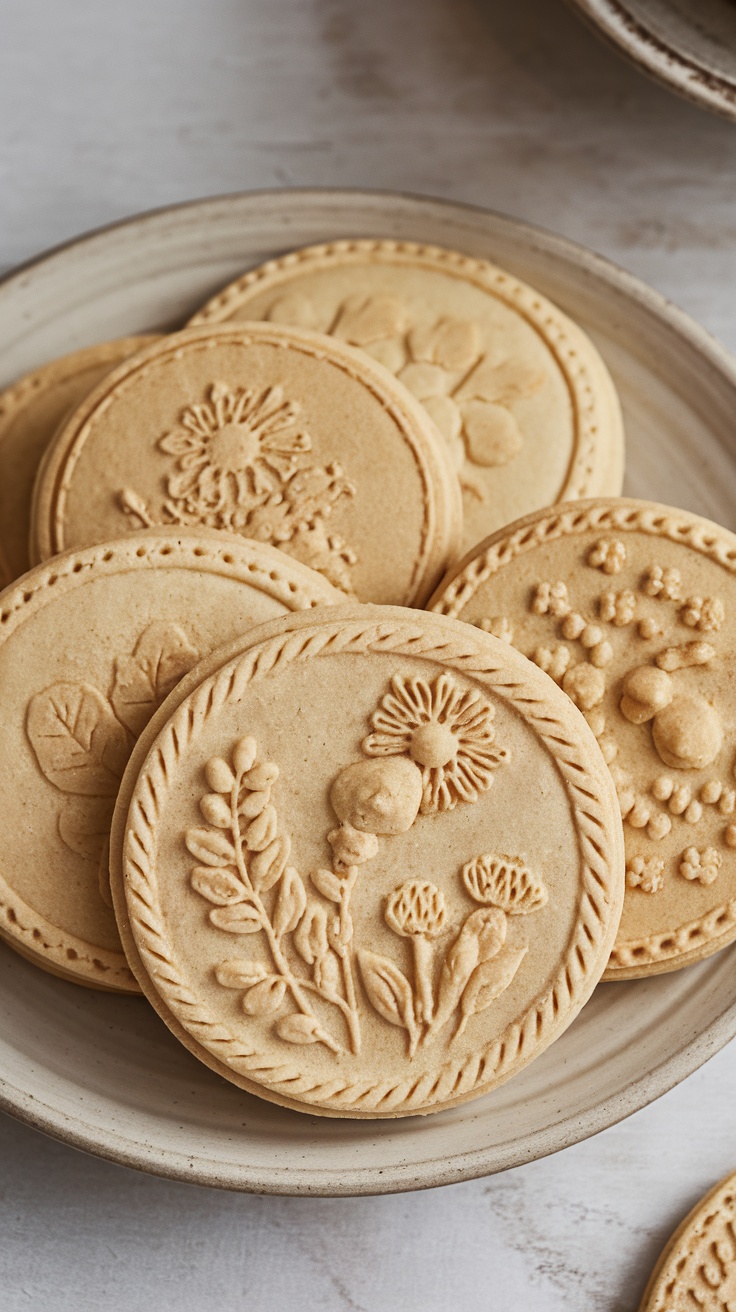
Springerle cookies are a delightful treat that brings a taste of tradition to your Easter celebrations. These anise-flavored cookies are not only visually appealing but also offer a unique crunchy texture that melts in your mouth. With their intricate designs and subtle sweetness, they are perfect for sharing or enjoying as a sweet snack with family and friends.
Making Springerle is quite simple, even if it requires a bit of time for the dough to dry. The process involves rolling out a fragrant dough and using a special mold to create beautiful patterns. Once baked, these cookies are sure to impress anyone at your holiday gathering!
Ingredients
- 4 cups all-purpose flour
- 1 teaspoon baking powder
- 1/4 teaspoon salt
- 1 cup granulated sugar
- 1/2 cup unsalted butter, softened
- 3 large eggs
- 1 teaspoon anise extract
- Powdered sugar for dusting
Instructions
- Prepare the Dough: In a bowl, whisk together flour, baking powder, and salt. In another bowl, cream the softened butter and sugar until light and fluffy. Beat in the eggs one at a time and add the anise extract. Gradually mix in the dry ingredients until a dough forms.
- Chill the Dough: Wrap the dough in plastic wrap and refrigerate for at least 2 hours or overnight to firm up.
- Roll and Cut: Preheat your oven to 350°F (175°C). On a floured surface, roll out the chilled dough to about 1/4 inch thick. Use an anise mold or cookie cutter to create shapes, pressing firmly to get clear designs.
- Dry the Cookies: Place the cookies on a baking sheet lined with parchment paper. Let them sit at room temperature for about 12 hours to dry out slightly.
- Bake: After drying, bake the cookies for 10-12 minutes or until the edges are lightly golden. Cool on a wire rack.
- Dust and Serve: Once cooled, dust with powdered sugar before serving. Enjoy these lovely cookies with a cup of tea or coffee!
Rainbow Cookies
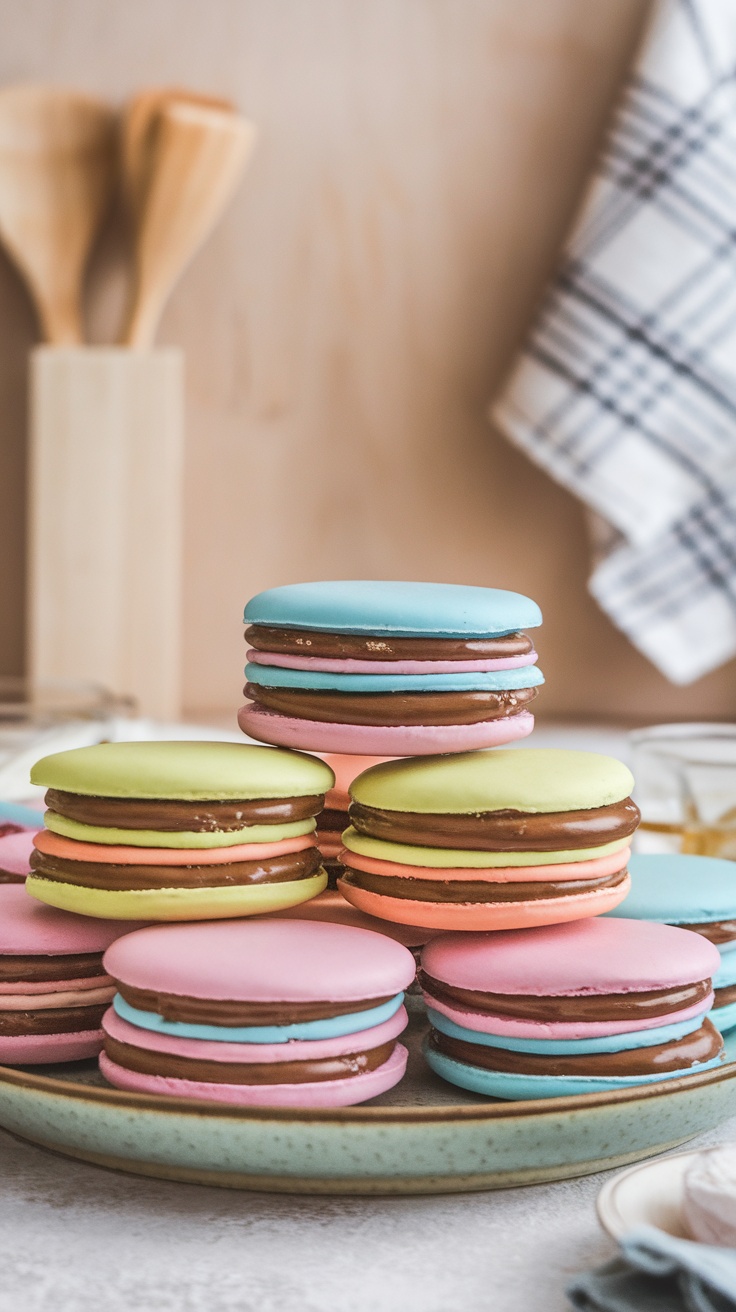
Rainbow cookies are a delightful treat that combines fun colors with a soft, sweet taste. These cookies are not just visually appealing but also easy to make, making them a hit for any holiday or gathering. The vibrant layers bring a festive spirit to your Easter celebrations.
Each bite offers a cheerful mix of flavors, and the colorful appearance is sure to bring smiles. Whether you’re baking with family or just want to brighten your day, these cookies are a simple and enjoyable recipe to try out!
Ingredients
- 2 3/4 cups all-purpose flour
- 1 teaspoon baking powder
- 1/2 teaspoon salt
- 1 cup unsalted butter, softened
- 1 1/4 cups granulated sugar
- 2 large eggs
- 2 teaspoons vanilla extract
- 1 teaspoon almond extract
- Food coloring (red, blue, yellow, green)
- 1 1/2 cups powdered sugar
- 2 tablespoons milk
Instructions
- Prepare the Dough: In a bowl, mix flour, baking powder, and salt. In another large bowl, cream together softened butter and sugar until light and fluffy. Add the eggs, vanilla, and almond extract, mixing well. Gradually add the flour mixture until combined.
- Color the Dough: Divide the dough into four equal parts. Add a few drops of food coloring to each part and knead until the colors are evenly distributed.
- Layer the Dough: Roll out each colored dough between two sheets of parchment paper into rectangles. Stack them in layers, starting with one color on the bottom, and gently press them together.
- Chill and Bake: Wrap the layered dough in plastic wrap and chill in the refrigerator for at least 2 hours. Preheat the oven to 350°F (175°C). Slice the chilled dough into thin cookies and place them on a baking sheet. Bake for 10-12 minutes or until lightly golden.
- Prepare the Glaze: In a small bowl, mix powdered sugar with milk until smooth. Drizzle over the cooled cookies for a sweet finishing touch.
Vegan Easter Cookies

If you’re looking to celebrate Easter with a sweet and colorful treat, these vegan Easter cookies are a delightful option! Soft and chewy, these cookies are easy to make and perfect for decorating with your favorite icing colors. The taste is a lovely mix of sweet and buttery, even without the traditional dairy ingredients. Plus, they are fun to make with family and friends!
This simple recipe allows you to unleash your creativity while making vibrant shapes like bunnies and chicks. Gather everyone around and enjoy a baking session that will fill your home with sweet aromas and joy. Let’s get started!
Ingredients
- 2 cups all-purpose flour
- 1/2 teaspoon baking powder
- 1/4 teaspoon salt
- 1/4 cup coconut oil, melted
- 1/2 cup granulated sugar
- 1/4 cup almond milk
- 1 teaspoon vanilla extract
- Food coloring (optional, for icing)
- 1 cup powdered sugar (for icing)
Instructions
- Mix Dry Ingredients: In a bowl, whisk together flour, baking powder, and salt.
- Combine Wet Ingredients: In another bowl, mix melted coconut oil, sugar, almond milk, and vanilla until smooth.
- Make the Dough: Gradually add the dry ingredients to the wet mixture, stirring until combined. Form the dough into a ball and refrigerate for 30 minutes.
- Roll and Cut: Preheat the oven to 350°F (175°C). Roll out the dough on a floured surface to about 1/4 inch thick. Use cookie cutters to shape your cookies.
- Bake: Place the cookies on a lined baking sheet and bake for 8-10 minutes, or until the edges are lightly golden. Let cool.
- Decorate: Mix powdered sugar with a little almond milk and food coloring to create icing. Decorate the cooled cookies as you like!
Gluten-Free Sugar Cookies

These gluten-free sugar cookies are a delightful treat for anyone looking to enjoy a sweet snack without gluten. They have a soft and buttery texture, making them a perfect addition to your Easter celebrations. Plus, they are simple to make, so you can whip them up in no time!
The flavor is light and sweet, allowing for easy customization. Whether you want to add colorful sprinkles or a hint of vanilla, these cookies are versatile enough to suit your taste. Get ready to impress your family and friends with these tasty treats!
Ingredients
- 2 cups gluten-free all-purpose flour
- 1/2 cup unsalted butter, softened
- 1 cup granulated sugar
- 1 large egg
- 1 teaspoon vanilla extract
- 1/2 teaspoon baking powder
- 1/4 teaspoon salt
Instructions
- Preheat the oven to 350°F (175°C) and line a baking sheet with parchment paper.
- In a large bowl, cream together the softened butter and sugar until light and fluffy.
- Add in the egg and vanilla extract, mixing until well combined.
- In another bowl, whisk together the gluten-free flour, baking powder, and salt.
- Gradually add the dry ingredients to the wet mixture, mixing until a dough forms.
- Roll the dough into small balls and place them on the prepared baking sheet, flattening them slightly.
- Bake for 10-12 minutes or until the edges are lightly golden. Allow cookies to cool before serving.
No-Spread Sugar Cookies

No-spread sugar cookies are a delightful treat that holds their shape beautifully, making them perfect for any occasion, especially Easter! These cookies are rich and buttery, with a hint of vanilla that makes them simply irresistible. Plus, they’re easy to whip up, making them a fantastic choice for festive baking with family or friends.
With their smooth surface, these cookies are not only delicious but also a blank canvas for all your decorating dreams. Whether you want to coat them in bright icing or sprinkle them with colorful decorations, they’ll shine in any festive spread. Here’s how you can make your own batch of no-spread sugar cookies for Easter!
Ingredients
- 2 ¾ cups all-purpose flour
- 1 teaspoon baking powder
- ½ teaspoon salt
- 1 cup unsalted butter, softened
- 1 ½ cups granulated sugar
- 1 large egg
- 1 teaspoon vanilla extract
Instructions
- Mix Dry Ingredients: In a bowl, whisk together flour, baking powder, and salt. Set aside.
- Cream Butter and Sugar: In a separate large bowl, beat the softened butter and granulated sugar until light and fluffy.
- Add Egg and Vanilla: Mix in the egg and vanilla extract until fully combined.
- Combine Mixtures: Gradually add the dry ingredients to the wet mixture, stirring until a dough forms. Don’t overmix!
- Chill the Dough: Wrap the dough in plastic wrap and chill in the refrigerator for at least 1 hour.
- Preheat the Oven: Preheat your oven to 350°F (175°C) and line baking sheets with parchment paper.
- Cut and Bake: Roll out the chilled dough to about ¼ inch thick and cut into your favorite shapes. Place them on the prepared baking sheets. Bake for 8-10 minutes, or until the edges are lightly golden.
- Cool and Decorate: Allow the cookies to cool on a wire rack before decorating them with icing and sprinkles!
Easter Nest Sugar Cookies
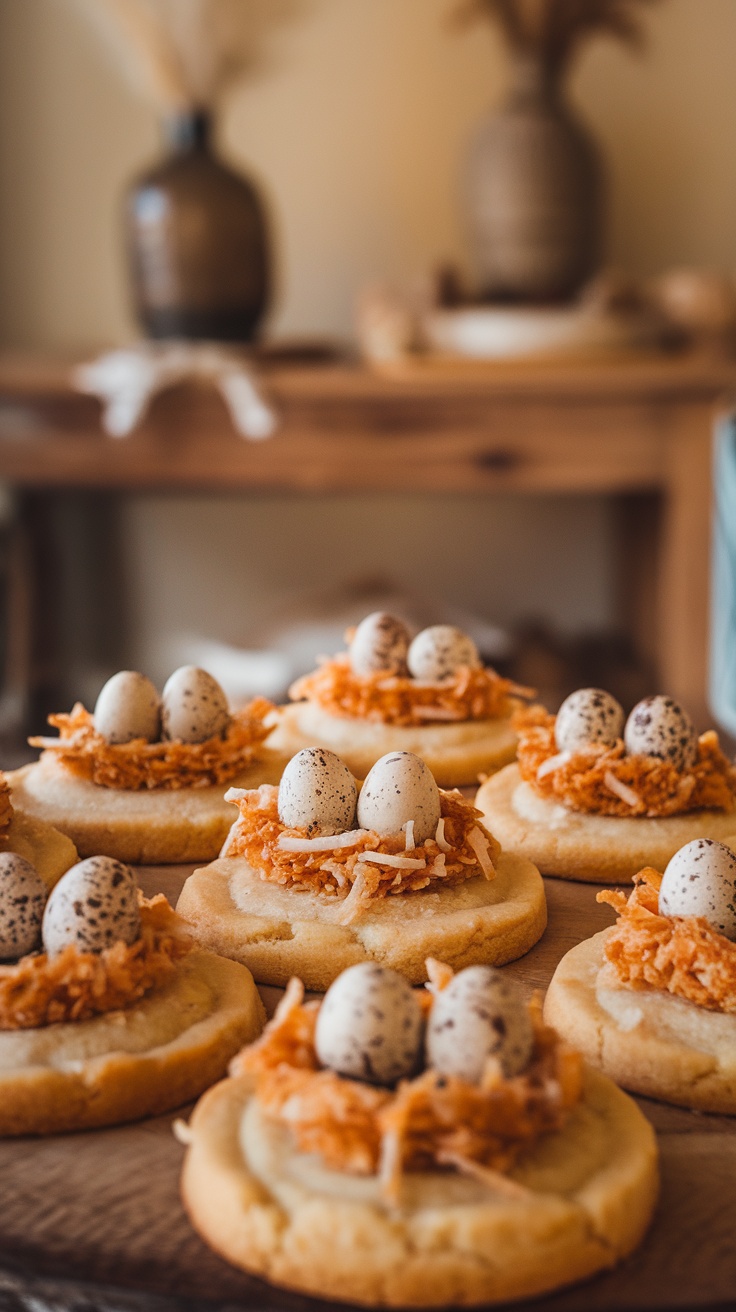
Easter Nest Sugar Cookies are a delightful treat that combines sweetness with a playful twist. These cookies have a soft and buttery base, topped with a nest of coconut and chocolate eggs that make them fun to decorate and eat. They are simple to make, perfect for family baking sessions, and they add a festive touch to any Easter celebration.
The cookies’ flavors are classic and comforting, with the added texture of the coconut providing a nice contrast. Kids and adults alike will love creating their own nests with colorful candy eggs. Grab your mixing bowl, and let’s get started!
Ingredients
- 2 3/4 cups all-purpose flour
- 1 teaspoon baking soda
- 1/2 teaspoon salt
- 1 cup unsalted butter, softened
- 1 1/2 cups granulated sugar
- 1 large egg
- 1 teaspoon vanilla extract
- 1 cup shredded coconut
- 1 cup chocolate eggs (or candy of choice)
Instructions
- Preheat the oven to 350°F (175°C) and line your baking sheets with parchment paper.
- In a bowl, whisk together the flour, baking soda, and salt; set aside.
- In a large mixing bowl, cream the softened butter and sugar until light and fluffy. Beat in the egg and vanilla extract until well combined.
- Gradually add the dry ingredients to the wet mixture, mixing until just combined.
- Drop tablespoon-sized balls of dough onto the prepared baking sheets, spacing them about 2 inches apart.
- Bake for 10-12 minutes, or until the edges are lightly golden. Allow to cool on the baking sheets for a few minutes before transferring to a wire rack to cool completely.
- Once cool, create a small indentation in the center of each cookie. Fill the indentation with shredded coconut to form a nest shape, and place chocolate eggs on top.
Easter Shortbread Cookies
Easter shortbread cookies are a delightful treat that captures the festive spirit of the holiday. With a buttery flavor and a tender texture, these cookies not only taste great but are also simple to make. Perfect for kids and adults alike, they can be decorated in various fun shapes that celebrate Easter themes.
Whether you’re hosting a gathering or just want to enjoy some sweet treats at home, these cookies are an easy option. You can customize them with colorful icing or sprinkles to make them even more festive. Let’s dive into the recipe!
Ingredients
- 2 cups all-purpose flour
- 1/2 cup granulated sugar
- 1 cup unsalted butter, softened
- 1 teaspoon vanilla extract
- 1/4 teaspoon salt
- 1 cup powdered sugar (for icing)
- 2-3 tablespoons milk (for icing)
- Food coloring (optional)
Instructions
- Make the Dough: In a bowl, cream together the softened butter and granulated sugar until light and fluffy. Mix in the vanilla extract and salt. Gradually add the flour until a soft dough forms.
- Chill the Dough: Wrap the dough in plastic wrap and refrigerate for at least 30 minutes. This helps the cookies maintain their shape while baking.
- Preheat the Oven: Preheat your oven to 350°F (175°C). Line a baking sheet with parchment paper.
- Shape the Cookies: Roll out the dough on a floured surface to about 1/4 inch thick. Use cookie cutters to cut out fun shapes for Easter.
- Bake: Place the cookies on the prepared baking sheet and bake for 10-12 minutes, or until the edges are lightly golden. Allow them to cool on a wire rack.
- Prepare the Icing: In a bowl, mix powdered sugar with milk until smooth. Add food coloring if desired for a festive look. Drizzle or spread the icing over the cooled cookies.
